If you have spent much time around ASP.NET MVC, you have no doubt used ModelState just like all other good little MVC developers. Have you ever peeked under the covers, though, and looked at why and how it works? In this post, we will do just that.

What is ModelState?
ModelState is, at its core, the values of a form during submission. The form fields come in as a collection of name-value pairs. The form fields are accessible from ModelState as the full name of the property of your model. For example, if your model is a standard object, such as a Contact object, the name of the ID field will be available as ModelState[“ID”]. However, if your model is a view model and the Contact object is a property on the view model, the property will be available as ModelState[“Contact.ID”]. This mechanism allows MVC to create objects for us such as a fully formed Contact object in the Post event. It may be of interest to know that when you investigate the ModelState dictionary, each item tracks the error messages and value for that field.
The value comes in the form of a ValueProviderResult which tracks both the attempted value and the raw value that was submitted for the field. This will typically be the same but it may help you troubleshoot errors in your model because you can see what was mapped to the value even if it didn’t get set on the object.
A Simple Scenario
We can create this scenario very quickly.
Listing 1.1 – The Contact Model Object
Notice the data annotations used for validation. I have added many to show just how many different ways you can validate your forms. The most common types are used but there are many, many more.
public class Contact
{
    [StringLength(100, ErrorMessage = "First Name must be between 2 and 100 characters.", MinimumLength = 2)]
    [Required(ErrorMessage = "First Name is required.")]
    [Display(Name = "First Name")]
    public string FirstName { get; set; }

    [StringLength(100, ErrorMessage = "Last Name must be between 2 and 100 characters.", MinimumLength = 2)]
    [Required(ErrorMessage = "Last Name is required.")]
    [Display(Name = "Last Name")]
    public string LastName { get; set; }

    [EmailAddress]
    [Required(ErrorMessage = "Email Address is required.")]
    [Display(Name = "Email Address")]
    public string EmailAddress { get; set; }

    [Phone]
    [Required(ErrorMessage = "Mobile Phone is required.", AllowEmptyStrings = false)]
    [Display(Name = "Mobile Phone")]
    public string MobilePhone { get; set; }

    [DataType(DataType.Date)]
    [Display(Name = "Birth Date")]
    public DateTime? BirthDate { get; set; }
}
Listing 1.2 – Create Form Markup
This form uses the generic create template available in MVC.
@model TestModelState.Models.Contact

@{
    ViewBag.Title = "Create";
}

<h2>Create</h2>


@using (Html.BeginForm())
{
    @Html.AntiForgeryToken()

    <div class="form-horizontal">
        <h4>Contact</h4>
        <hr />
        @Html.ValidationSummary(true, "", new { @class = "text-danger" })
        <div class="form-group">
            @Html.LabelFor(model => model.FirstName, htmlAttributes: new { @class = "control-label col-md-2" })
            <div class="col-md-10">
                @Html.EditorFor(model => model.FirstName, new { htmlAttributes = new { @class = "form-control" } })
                @Html.ValidationMessageFor(model => model.FirstName, "", new { @class = "text-danger" })
            </div>
        </div>

        <div class="form-group">
            @Html.LabelFor(model => model.LastName, htmlAttributes: new { @class = "control-label col-md-2" })
            <div class="col-md-10">
                @Html.EditorFor(model => model.LastName, new { htmlAttributes = new { @class = "form-control" } })
                @Html.ValidationMessageFor(model => model.LastName, "", new { @class = "text-danger" })
            </div>
        </div>

        <div class="form-group">
            @Html.LabelFor(model => model.EmailAddress, htmlAttributes: new { @class = "control-label col-md-2" })
            <div class="col-md-10">
                @Html.EditorFor(model => model.EmailAddress, new { htmlAttributes = new { @class = "form-control" } })
                @Html.ValidationMessageFor(model => model.EmailAddress, "", new { @class = "text-danger" })
            </div>
        </div>

        <div class="form-group">
            @Html.LabelFor(model => model.MobilePhone, htmlAttributes: new { @class = "control-label col-md-2" })
            <div class="col-md-10">
                @Html.EditorFor(model => model.MobilePhone, new { htmlAttributes = new { @class = "form-control" } })
                @Html.ValidationMessageFor(model => model.MobilePhone, "", new { @class = "text-danger" })
            </div>
        </div>

        <div class="form-group">
            @Html.LabelFor(model => model.BirthDate, htmlAttributes: new { @class = "control-label col-md-2" })
            <div class="col-md-10">
                @Html.EditorFor(model => model.BirthDate, new { htmlAttributes = new { @class = "form-control" } })
                @Html.ValidationMessageFor(model => model.BirthDate, "", new { @class = "text-danger" })
            </div>
        </div>

        <div class="form-group">
            <div class="col-md-offset-2 col-md-10">
                <input type="submit" value="Create" class="btn btn-default" />
            </div>
        </div>
    </div>
}

<div>
    @Html.ActionLink("Back to List", "Index")
</div>

@section Scripts {
    @Scripts.Render("~/bundles/jqueryval")
}
Listing 1.3 – Create Post Method
if(ModelState.IsValid)
{
    ViewBag.Message = "Create Successful";
    return View(contact);
}
else
{
    return View(contact);
}
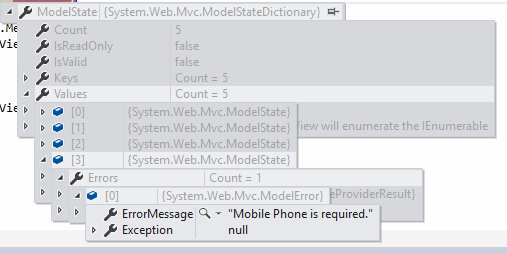
If you set a breakpoint at the ModelState.IsValid line and submit an empty form, you will be able to see the validation errors declared in the class via DataAnnotations. This would be the same for all other validation providers.
Conclusion
ModelState offers an end-to-end validation mechanism when combined with a good validation provider such as DataAnnotations. It provides a comprehensive way to report on automated errors such as those from Data Annotations and it allows you to add your own validation errors as well. MVC goes even further by providing an out-of-the-box solution to report on those validation errors in the form of the validation-related HTML Helpers.