The Difference Between Stack and Heap for Variables in the .NET Framework

The differences between variables stored on the stack versus variables stored on the heap when using the .NET Framework are, on the surface, small. However, if you understand what is happening behind the scenes, they are actually two different worlds.
It is required that you understand a couple of things about variables before understanding where they are stored at. First, there are two main types of variables in the .NET Framework: Value Types and Reference Types. Pointers also exist which is a third type but we are focusing on the 99% here which means value types and reference types.

Value Types

Value Type types inherit from System.ValueType and they are different because they hold the data for the type in their own memory allocation. All the types below are value types:

  • bool
  • byte
  • char
  • date
  • decimal
  • double
  • enum
  • float
  • int
  • long
  • sbyte
  • short
  • struct
  • uint
  • ulong
  • ushort

You will notice that all numeric types are value types and most of the items in that list have numeric values like enum and date. There are a couple of oddities in that list, however. Like struct. Even if a struct contains variables that are not value types, the struct is a value type. So, where does a value type live? The stack or the heap? Typically, the stack. You can declare a value type on the heap but that is another discussion for later. Value Type = stack.

Reference Types

Reference types inherit from System.Object and do not contain their own values but a pointer to the value. The list below contains a list of reference types:

  • array
  • class
  • delegate
  • interface
  • object
  • string

The list of reference types is much shorter but most of the .NET Framework is made up of reference types. There is also an oddity in this list: array. Even an array of value types, such as integers, is a reference type. Where do reference type types live? On the heap. Always.

Code Displaying the Differences

Consider the following code that demonstrates the differences between the stack and the heap.

int number1 = 5;
int number2 = 12;

Console.WriteLine($"The value of number1: {number1}");
Console.WriteLine($"The value of number2: {number2}");

//Output
//The value of number1: 5
//The value of number2: 12

Console.ReadKey();

number2 = number1;

Console.WriteLine($"The value of number1: {number1}");
Console.WriteLine($"The value of number2: {number2}");

//Output
//The value of number1: 5
//The value of number2: 5

Console.ReadKey();

number1 = 15;

Console.WriteLine($"The value of number1: {number1}");
Console.WriteLine($"The value of number2: {number2}");

//Output
//The value of number1: 15
//The value of number2: 5

Console.ReadKey();

So, why does this happen? After setting number2 = number1, we changed the value of number1 but number2 didn’t get updated. Why? Well, if you remember from above, value types contain their own data within their own allocated memory so by setting number2 = number1, we gave number2 the same value but they were not the same memory allocation so updating one doesn’t update the other.

Now, lets look at reference types.

Customer customer1 = new Customer
{
    Name = "Test Customer 1"
};

Customer customer2 = new Customer
{
    Name = "Test Customer 2"
};

Console.WriteLine($"Customer 1 Name: {customer1.Name }");
Console.WriteLine($"Customer 2 Name: {customer2.Name }");

//Output
//Customer 1 Name: Test Customer 1
//Customer 2 Name: Test Customer 2

Console.ReadKey();

customer2 = customer1;

Console.WriteLine($"Customer 1 Name: {customer1.Name }");
Console.WriteLine($"Customer 2 Name: {customer2.Name }");

//Output
//Customer 1 Name: Test Customer 1
//Customer 2 Name: Test Customer 1

Console.ReadKey();

customer1.Name = "Customer 3";

Console.WriteLine($"Customer 1 Name: {customer1.Name }");
Console.WriteLine($"Customer 2 Name: {customer2.Name }");

//Output
//Customer 1 Name: Customer 3
//Customer 2 Name: Customer 3
Console.ReadKey();

customer2.Name = "Customer 4";

Console.WriteLine($"Customer 1 Name: {customer1.Name }");
Console.WriteLine($"Customer 2 Name: {customer2.Name }");

Output:
//Customer 1 Name: Customer 4
//Customer 2 Name: Customer 4
Console.ReadKey();

So, what is going on here? Notice that after setting customer2 = customer1 that updating the name for either customer1 or customer2 updates the other. This is because customer1 and customer2 are reference types. After setting customer2 = customer1, they are pointed to the same memory allocation on the heap so updating either one of them updates the memory that each of them have a pointer to which causes the value of both to change.

Two Unlikely Great Books to Read

I am a Kindle Unlimited subscriber. This opens up an entire world of books that I likely would not read otherwise in business, self-development, and fantasy (which I love) but, let’s be honest. Many of the books included in the Unlimited library just aren’t that great. I can’t count the number of books that I returned in disgust because the author could not be bothered to proofread their own work. This amazes me because they went through the long and likely (I am not an author so I don’t know) arduous process of putting it together and then failed to proofread it. These two books, though, are not like that. They are some of the best I have found this year.

Your First 100: How to Get Your First 100 Repeat Customers (and Loyal, Raving Fans) Buying Your Digital Products Without Sleazy Marketing or Selling Your Soul by Meera Kothand

This is a book about building a subscriber list and, true to it’s title, didn’t make me feel dirty while reading it. I strongly suggest you read it if you are starting a blog or building an audience. I am still working on implementing some of the ideas in the book so I can’t even be sure that the methods in the book work but the book made me think and changed my thinking on several things such as list building and charging what you are worth. I was so impressed with the author’s ideas I bought her other book and started going through her blog and website. Good stuff.


Buy Buttons

Buy Buttons: The Fast-Track Strategy to Make Extra Money and Start a Business in Your Spare Time [Featuring 300+ Apps and Peer-to-Peer Marketplaces] by Nick Loper

This book does a really good job of convincing you to utilize existing marketplaces instead of trying to build your own. After all, building a marketplace is extremely hard but it can be very easy to create a product or service that can be placed in a preexisting marketplace. Some of the stories are good and it led me to Side Hustle Nation which Nick runs. Definitely worth checking out.


Check out these books if the topics appeal to you. There are probably hundreds of hidden gems in Kindle Unlimited but these are two of the best I have found this year.

Entity Framework for Beginners Part 4 – Extras

This post is part 4 of 4 covering Entity Framework Code-First for Beginners.

  1. Part 1 – Setting Up Entity Framework Code-First for Beginners
  2. Part 2 – Migrations in Entity Framework Code-First
  3. Part 3 – DbContext
  4. Part 4 – Entity Framework Code-First Extras

To this point, we have covered the basics of Entity Framework. In this post, I will go over six things that are not so obvious. Of course, this list is not exhaustive or even extensive but it does cover several that I hope will be useful.


  1. You can pass the name of a connection string from your configuration file to a DbContext
    ApplicationDbContext context = new ApplicationDbContext("DefaultConnection");

    This requires that you set up a constructor in your DbContext to accept a parameter and then pass that to the base DbContext.

    public ApplicationDbContext(string connectionName) : base(connectionName)
    {
    
    }
  2. You can pass a connection string to a DbContext.
    public ApplicationDbContext(string connectionString)
    {
        Database.Connection.ConnectionString = connectionString;
    }
  3. Entity Framework is open source. You can view it in it’s entirety here.
  4. You can use .AsNoTracking() to increase performance IF you do not need change tracking (you are 100% sure you will not be making changes to the objects that need to be persisted back to the database).
    IQueryable<ApplicationUser> users = Users.AsNoTracking();
  5. You can disable change tracking if you need to write many changes back to the database. You need to understand the risks. Even if you turn change tracking back on, entities that were changed may still be in Entity Framework’s object cache and will not reflect their changed state.
    ApplicationDbContext context = new ApplicationDbContext();
    context.Configuration.AutoDetectChangesEnabled = false;
    //Update thousands of records
    context.Configuration.AutoDetectChangesEnabled = true;
  6. You can execute your own queries against Entity Framework quite easily and even use them to populate entities.
    ApplicationDbContext context = new ApplicationDbContext();
    string id = "66e80932-94a9-4a46-aab5-8be2dc456f49";
    string sql = "SELECT * FROM AspNetUsers WHERE ID = @p0";
    
    ApplicationUser user = context.Set<ApplicationUser>().SqlQuery(sql, id).SingleOrDefault();


This wraps up the Entity Framework for Beginners series. I hope you have enjoyed it and have learned a few things a long the way.

Entity Framework for Beginners Part 3 – DbContext

This post is part 3 of 4 covering Entity Framework Code-First for Beginners.

  1. Part 1 – Setting Up Entity Framework Code-First for Beginners
  2. Part 2 – Migrations in Entity Framework Code-First
  3. Part 3 – DbContext
  4. Part 4 – Entity Framework Code-First Extras

The DbContext is Entity Framework’s keystone. It is where all the action takes place. In this post, I will show you how to use it and some of the out-of-the-box behaviors the DbContext has and how to use it in your own applications. If you haven’t been following along with the series, start by downloading the sample project here and reading part 1 above.

As I mentioned, the DbContext is the central hub of Entity Framework in our applications. It houses our model classes and is what we will use to access the data in our application. In order to access those model classes, we need to declare an instance of the DbContext. We also need a strategy here. Unless you want to keep writing the same code over and over, we need a central location that we can use in order to access our data without a bunch of duplication in our code base. There are a couple of different ways we can go about this but the Repository design pattern is a popular way to go and is fairly straightforward to implement so we will use that. Some of the alternatives are GenericRepository (which is lightly covered at the end of this post) and the Command Query Separation pattern or it’s more complicated cousin pattern Command Query Responsibility pattern.

Lets add a new class to the Code\DataAccess folder named ContactRepository.cs. We need to create an instance of the DbContext in our repository. I am also going to group the constructors here. If you notice, there is a second constructor that allows us to pass the DbContext into this repository. If the application expands and a second repository is added, business logic that sits on top of this may want to combine the results from the new repository and from ContactRepository. If you are returning IQueryable objects from your repositories (you should), you can’t combine the results from two different DbContexts even if they are copies of the same DbContext and both repositories will have their own copy.

private ContactManagerDbContext _context = null;

public ContactRepository()
{
    _context = new ContactManagerDbContext();
}

public ContactRepository(ContactManagerDbContext context)
{
    _context = context;
}

Now that we have our context wired up, let’s take a look at the code to perform CRUD operations and to return a list of Contacts.

//Return an IQueryable<Contact> of all contacts.
public IQueryable<Contact> GetContacts()
{
    return _context.Contacts;
}

//Return a single contact
public Contact GetContact(int contactId)
{
    return GetContacts().Single(c => c.ID == contactId);
}

//This method assumes the contact is already attached. Save the changes to the database.
public bool UpdateContact(Contact contact)
{
    try
    {
        _context.SaveChanges();
        return true;
    }
    catch (Exception ex)
    {
        LogException(ex);
        return false;
    }
}

//Delete the contact.
public bool DeleteContact(Contact contact)
{
    try
    {
        _context.Contacts.Remove(contact);
        _context.SaveChanges();
        return true;
    }
    catch(Exception ex)
    {
        LogException(ex);
        return false;
    }
}

//Add a new contact
public bool AddContact(Contact contact)
{
    try
    {
        _context.Contacts.Add(contact);
        _context.SaveChanges();
        return true;
    }
    catch(Exception ex)
    {
        LogException(ex);
        return false;
    }
}

As you might imagine, this code would get very repetitive if we have three or more repositories that are similar to this one. This is where the GenericRepository comes in. Now, before you get too excited, understand that there are drawbacks to the GenericRepository pattern. It is an a real pain to unit test. Most people wrap the GenericRepository in a UnitOfWork pattern that allows them to more easily test. It is up to you to determine just how much abstraction you need. Below is the code for a very similar GenericRepository to the one above.

public class GenericRepository
{
    private ContactManagerDbContext _context = null;

    public GenericRepository()
    {
        _context = new ContactManagerDbContext();
    }

    public GenericRepository(ContactManagerDbContext context)
    {
        _context = context;
    }

    public IQueryable<T> GetAll<T>() where T : class
    {
        return _context.Set<T>();
    }

    public bool Update<T>(T item) where T : class
    {
        try
        {
            _context.Set<T>().Attach(item);
            _context.SaveChanges();
            return true;
        }
        catch(Exception ex)
        {
            LogException(ex);
            return false;
        }
    }

    public bool Delete<T>(T item) where T : class
    {
        try
        {
            _context.Set<T>().Remove(item);
            _context.SaveChanges();
            return true;
        }
        catch(Exception ex)
        {
            LogException(ex);
            return false;
        }
    }

    public bool Add<T>(T item) where T : class
    {
        try
        {
            _context.Set<T>().Add(item);
            _context.SaveChanges();
            return true;
        }
        catch(Exception ex)
        {
            LogException(ex);
            return false;
        }
    }

    private void LogException(Exception ex)
    {

    }
}

There are a couple of issues for the code above but I don’t want to spend a whole lot of time on it. There isn’t a SaveChanges() method available outside the class and if you are performing a long list of operations, you are saving after each and every one of those operations.

Hopefully, this post gives you a good idea of how to use Entity Framework in your own applications. The next post will give a few helpful tidbits on the usage of Entity Framework and the series will wrap up.


Entity Framework for Beginners Part 2 – Migrations

This post is part 2 of 4 covering Entity Framework Code-First for Beginners.

  1. Part 1 – Setting Up Entity Framework Code-First for Beginners
  2. Part 2 – Migrations in Entity Framework Code-First
  3. Part 3 – DbContext
  4. Part 4 – Entity Framework Code-First Extras

In this post, I will take a close look at Entity Framework migrations. Migrations are a way to get changes in the model of your code into your database. Migrations can also seed data, or get some default data into your database. Let’s get started.

Why use Entity Framework migrations?

It’s a good question. You will have to decide if it is worth it to you after reading this article but don’t do yourself a disservice and ignore it. We have all been there. We update our code and forget to make the changes to the database. Using migrations means that you don’t have to worry about that. If you do it right, it is pretty seamless.

How to use Entity Framework migrations?

This is a step-by-step process. I am providing a sample project here. Download it and open it in Visual Studio 2017. From this point on, I will assume you are using this project. The database specified in this project uses SQL Server Express and will be located in the App_Data folder.

If you run the application, nothing really happens at this point. Its just the boilerplate ASP.NET MVC application. We have a model class, but, since we aren’t using the DbContext yet, nothing changes.

The first thing we need to do is enable migrations. In the Tools menu, hover over the NuGet Package Manager option and select Package Manager Console. This will open the NuGet console, probably in the Tools tabs at the bottom of your screen. In the package manager console, enter the following command:

enable-migrations

The enable-migrations command will give us a new folder in the project named Migrations. In the Migrations folder is a new class named Configuration. The Configuration class has a method named Seed.

Seeding Data

Seed allows us to insert default data into our database. This will allow us to maintain data between updates to the database performed by migrations. Copy the code below into the Migrations\Configuration.cs file to populate the Contacts table with some default data.

context.Contacts.AddOrUpdate<Contact>(new Contact { FirstName = "Harry", HomePhone = "555-555-5555", ID = 1, IsActive = true, LastName = "Bosch", MobilePhone = "555-555-5556" });
context.Contacts.AddOrUpdate<Contact>(new Contact { FirstName = "Dalinar", HomePhone = "555-555-5555", ID = 2, IsActive = true, LastName = "Kholin", MobilePhone = "555-555-5556" });
context.Contacts.AddOrUpdate<Contact>(new Contact { FirstName = "Mat", HomePhone = "555-555-5555", ID = 3, IsActive = true, LastName = "Cauthon", MobilePhone = "555-555-5556" });
context.Contacts.AddOrUpdate<Contact>(new Contact { FirstName = "Eddard", HomePhone = "555-555-5555", ID = 4, IsActive = true, LastName = "Stark", MobilePhone = "555-555-5556" });
context.Contacts.AddOrUpdate<Contact>(new Contact { FirstName = "Albus", HomePhone = "555-555-5555", ID = 5, IsActive = true, LastName = "Dumbledore", MobilePhone = "555-555-5556" });
context.Contacts.AddOrUpdate<Contact>(new Contact { FirstName = "Bruce", HomePhone = "555-555-5555", ID = 6, IsActive = true, LastName = "Wayne", MobilePhone = "555-555-5556" });
context.Contacts.AddOrUpdate<Contact>(new Contact { FirstName = "Elayne", HomePhone = "555-555-5555", ID = 7, IsActive = true, LastName = "Trakand", MobilePhone = "555-555-5556" });
context.Contacts.AddOrUpdate<Contact>(new Contact { FirstName = "George", HomePhone = "555-555-5555", ID = 8, IsActive = true, LastName = "Smiley", MobilePhone = "555-555-5556" });
context.Contacts.AddOrUpdate<Contact>(new Contact { FirstName = "Jack", HomePhone = "555-555-5555", ID = 9, IsActive = true, LastName = "Ryan", MobilePhone = "555-555-5556" });
context.Contacts.AddOrUpdate<Contact>(new Contact { FirstName = "Locke", HomePhone = "555-555-5555", ID = 10, IsActive = true, LastName = "Lamora", MobilePhone = "555-555-5556" });
context.Contacts.AddOrUpdate<Contact>(new Contact { FirstName = "Jamie", HomePhone = "555-555-5555", ID = 11, IsActive = true, LastName = "Lannister", MobilePhone = "555-555-5556" });
context.Contacts.AddOrUpdate<Contact>(new Contact { FirstName = "Mitch", HomePhone = "555-555-5555", ID = 12, IsActive = true, LastName = "Rapp", MobilePhone = "555-555-5556" });

Also, in the Configuration.cs file, change the Configuration constructor to be AutomaticMigrationsEnabled = true;

Now, we need to go back to the NuGet Package Manager Console. Type in the command update-database

The update database command will insert our seed data but does a bit more that we will get into next.

Schema Changes

We can also use Entity Framework Migrations to update our database schema when our model classes change. Take another look at the Contacts model class. Entity Framework is a convention-based framework. Look at the ID column. You will see that it hasn’t been decorated with the [Key] data annotation attribute but if you look at the database table, the ID column is indeed our primary key and it is also an Identity column. This is because ID is, by Entity Framework convention, an identity and primary key column if no other primary key is defined in the model class.

The AddOrUpdate commands we are issuing in the Configuration.cs file will attempt to update existing data if it finds a matching primary key column. Otherwise, it will insert a new record. Now, in the Contact.cs model class, add a string property named EmailAddress.

public string EmailAddress { get; set; }

Because it is a string property, we don’t have to worry about nulls right now. We just want the field added.

So, back in the NuGet Package Manager Console window, run the update-databasecommand again. If you look at the Contacts table definition, you should see the EmailAddress field present.

Conclusion

Well, that is a basic introduction to Entity Framework migrations. I have hit on most of the stuff you simply have to know to be effective with migrations. I hope you have enjoyed this part of the series and will see you in the next installment when we look at how to use Entity Framework. The finished product can be downloaded from here.

Entity Framework Code First for Beginners Part 1 – Setup

This post is part 1 of 4 covering Entity Framework Code-First for Beginners.

  1. Part 1 – Setting Up Entity Framework Code-First for Beginners
  2. Part 2 – Migrations in Entity Framework Code-First
  3. Part 3 – DbContext
  4. Part 4 – Entity Framework Code-First Extras

Entity Framework code-first doesn’t always get the love that database-first does for beginners but in this post, I will show how you can easily get up and running with code-first. This post is targeted towards beginners with little or no experience with code-first design and I will show how to set Entity Framework up in a real-world project.

Create a New Project

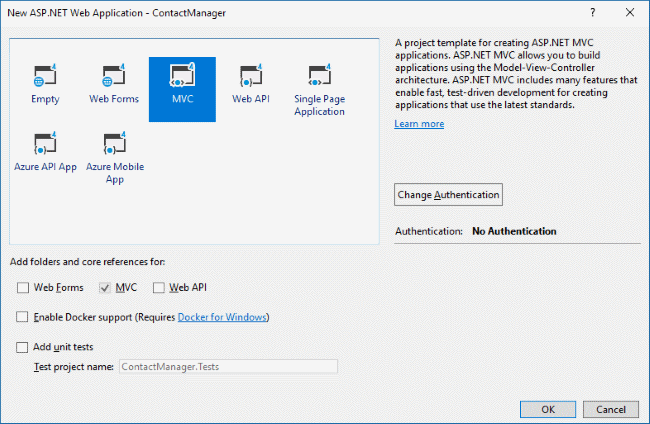
Let’s start by creating a new ASP.NET Web Application (.NET Framework) project and naming it ContactManager. If you would prefer, you can download the finished project from here.

Make sure that the MVC Project option is selected as below.

Reference Entity Framework

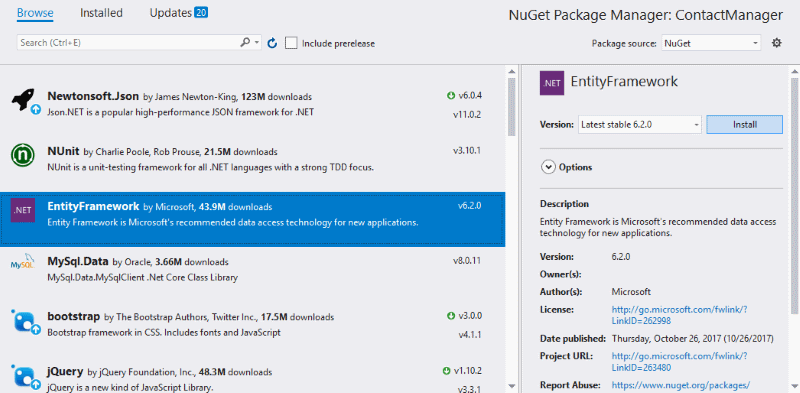
The first thing that we need to do is use NuGet to create a reference to Entity Framework. Right-click the ContactManager project and select the Manage NuGet Packages menu item. Click the Install button.

Setting Up the DbContext

Next, we need to create a DbContext that we can use to access our data. Add a folder named Code to the project. Add a sub-folder to the Code folder named Model. Add a new class to the Model folder and name it Contact. Below is the contents of Contact.cs.

namespace ContactManager.Code.Model
{
    public class Contact
    {
        public int ID { get; set; }
        public string FirstName { get; set; }
        public string LastName { get; set; }
        public string HomePhone { get; set; }
        public string MobilePhone { get; set; }
        public bool IsActive { get; set; }
    }
}

Add a class to the DataAccess folder and name it ContactManagerDbContext. This class will inherit from System.Data.Entity.DbContext. We also need to add DbSets<T> for our Contact model class. Below is the DbContext.

using ContactManager.Code.Model;
using System.Data.Entity;

namespace ContactManager.Code.DataAccess
{
    public class ContactManagerDbContext : DbContext
    {
        public DbSet<Contact> Contacts { get; set; }
    }
}


Setting Up the Connection String

Finally, before we can really use the DbContext for CRUD operations, we need to create the connection string for the context. In the web.config or app.config file, add a <connectionStrings>...</connectionStrings>section.

We will then add a new connection string. Like so:

<add name="ContactManager.Code.DataAccess.ContactManagerDbContext"
         connectionString="Data Source=(local);Trusted_connection=yes;Initial Catalog=ContactManagerData"
         providerName="System.Data.SqlClient" />


Pay attention to the name of the connection string. It is the fully qualified name of our DbContext from above. The namespace ContactManager.Code.DataAccess plus a dot and the name of the context ContactManagerDbContext.


Wrapping Up

That is all there is to it. In less than 2 minutes, you can be up and running with code-first and have ultimate control over your model objects. I always disliked database-first with EDMX for that very reason.

In the next post, I will show you what you need to know about Entity Framework migrations and how they can be useful.

Using SignalR in an ASP.NET MVC Application

SignalR is a real-time communication framework from Microsoft. SignalR can be used for communications between the server and client and between clients by using the server as a go between. In this post, I will show you how to create yet another chat application (there are many already out there using SignalR) but I will look at some of the conventions and features in the framework to make it easier to integrate into your applications.Let’s get started by using NuGet to add a reference to the Microsoft.AspNet.SignalR library. This will install several different packages to your project including three other Microsoft.AspNet.SignalR libraries and there are a few dependencies on OWIN.

Next, add a new folder to your project. Name it Hubs. Having SignalR referenced in our project will allow us to create a new object type to our project named Hub. Right click the Hubs folder and hover over the Add menu item. In the resulting list, you should have an entry for SignalR Hub Class (v2). If you do, click it and name it ChatHub. If you don’t have the SignalR Hub Class (v2) option, just add a normal class named ChatHub. In the ChatHub class, copy the below code into it. You will have to change the namespace if you are copying the entire thing.


using Microsoft.AspNet.SignalR;

namespace AspNetMvcSignalRDemo.Hubs
{
    public class ChatHub : Hub
    {
        public void Send(string name, string message)
        {
            Clients.All.addMessage(name, message);
        }
    }
}

Let’s talk about this code listing for a second. I want to call your attention to the Send method name. The client-side proxy that gets generated for us will use pascal casing for send. It is important because it often trips up developers new to SignalR.

Now, in the page that you are using to test this, we need to add quite a bit of code and we need some structure in our HTML file. I am also assuming that you are using Bootstrap v3.

Lets start with the HTML. Paste the below code into your file.

<h2>Chat</h2>
<div class="container">
    <div class="row">
        <div class="col-md-6">
            <div class="form-horizontal">
                <div class="form-group">
                    <div class="col-md-6">
                        <input type="text" id="messageText" class="form-control" />
                    </div>
                    <div class="col-md-6">
                        <button type="button" id="sendMessage" class="btn btn-sm btn-success">Send</button>
                    </div>
                </div>
                <input type="hidden" id="displayName" />
            </div>
            <div style="margin-top: 20px;">
                <ul class="list-group" id="discussionList"></ul>
            </div>
        </div>
    </div>
</div>

Finally, we have to add piece of JavaScript to the page. I am using an external file but that is up to you.

$(function () {
    //This is a reference to the automatically generated proxy for the chatHub. Notice the casing.  
    var chatConnection = $.connection.chatHub;

    //We are adding a method to the chatConnection.client proxy so that it is available later.
    chatConnection.client.addMessage = function (name, message) {
        //Add the message to the page. 
        $('#discussionList').append('<li class="list-group-item"><strong>' + name
            + '</strong>: ' + message + '</li>');
    };

    //When the page loads, we will prompt the user to enter their name and then store that value in the 
    //hidden field so we can grab it later.
    $('#displayName').val(prompt('Enter your name:', ''));

    //Set initial focus to messageText input box.  
    $('#messageText').focus();

    //Start the connection.
    $.connection.hub.start().done(function () {
        $('#sendMessage').click(function () {
            //Call the Send method on the hub. Notice the casing of send. On the server, it is Send and on the client, send. 
            chatConnection.server.send($('#displayName').val(), $('#messageText').val());

            //Reset the textbox
            $('#messageText').val('').focus();
        });
    });
});

That is all there is to it. To test this, run the site and navigate to the page. I am using both Chrome and Edge at the same time to ensure it is working.


You can download a repo here.

How do You Determine What to Learn Next?

It’s no secret that as developers, the learning curve is literally never ending. It is just impossible to stay caught up completely on a modern set of skills. In this post, I will show my method of how I determine what I will learn next.

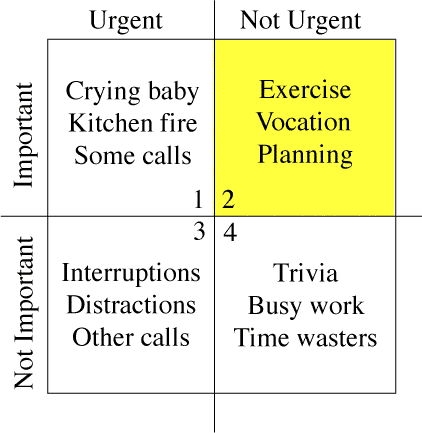
If you have ever read The 7 Habits of Highly Effective People you are probably familiar with the four quadrants. If you haven’t read it, there is an image of the concept below.

I use a similar matrix to categorize what I need and want to learn. I am a Microsoft full stack developer so the technologies and skills I use daily are C#, ASP.NET MVC, SQL Server, Entity Framework, T-SQL, Bootstrap, AngularJS, Angular, JavaScript, software architecture, etc. The technologies and skills that I am 100% comfortable with and don’t feel a pressing need to learn more about go in Quadrant 2, Important/Not Urgent. These are sharpen the saw activities that I need to stay up to date on but taking another course or reading another book on C#, for example, is likely to net me very little. However, when a new version of C# is released, I need to get up to speed on it as soon as possible. In my skills matrix, I list C#, ASP.NET MVC, Entity Framework, T-SQL, SQL Server, JavaScript, AngularJS, SSIS, and BootstrapV3 in Quadrant 2.

In Quadrant 1, Important/Urgent, I list the skills from three different categories:

  1. Skills I am currently using that I need more knowledge of or experience with.
  2. Skills, technologies, and frameworks that I know are in the pipeline and I will be using soon.
  3. Skills that, if I knew more, would give me a better quality of life.

In Quadrant 1, I have Angular, BootstrapV4, RxJS, NgRx, TypeScript, ng-bootstrap, project management, sales, marketing, branding, and software architecture. All of these items, if I were more knowledgeable about, would give me much better footing. Skills like software architecture will always be in Quadrant 1.

In Quadrant 3, Urgent/Not Important, I list skills that will probably be very important to me at some point but until my list in Quadrant 1 gets much smaller, won’t be feasible. WordPress, Python, DevOps, and artificial intelligence are a few items on this list but there are many, many more. All of these skills would help me, I know, but time is limited and I have to be mindful of where I am spending it.

Finally, in Quadrant 4, I list skills that I like the sound of and would learn to love at some point, but just aren’t anywhere on my radar currently. A mountain would have to be moved before I could actually justify spending time on them. Rust, R, and Unity3D are in this list but, again, it is long.

I actually schedule a few hours each week to work on items in Quadrant 1. I typically focus on one skill so that I can eventually move it to Quadrant 2. Right now, that is Angular, RxJS, and TypeScript and it is more than just a few hours, it is about 8-10 hours.

When I have downtime, I first look at Quadrant 2 and try to determine if there is anything recent that I need to be aware of and get up to speed on. If not, I more to Quadrant 1.

As for Quadrant 3 and 4, I look at these lists every month or so and see if there is anything that needs to leave the list or be added but that is all the attention they get.

What about you? How do you determine where you spend available learning time?

Creating an Entity Framework Interceptor to Log All Queries

Debugging queries generated by Entity Framework can be a huge hassle. In the past, the easiest way to was to either use an Entity Framework profiler and most of them are not free or use a profiler in the database engine to capture them. However, Entity Framework has the concept of an Interceptor that can be used to perform some action before or after a query or command executes. Sadly, the IDbCommandInterceptor interface isn’t widely documented or used. In this post, I will show you how to set up an Interceptor to log all the commands being executed by Entity Framework very quickly.

Since we know what an interceptor is, how can we capture the commands that Entity Framework is executing? Add a new class to your project and name it DbCommandInterceptor. This class has to inherit from System.Data.Entity.Infrastructure.Interception.IDbCommandInterceptor

If we then implement the interface, we will have six methods: NonQueryExecuted, NonQueryExecuting, ReaderExecuted, ReaderExecuting, ScalarExecuting, and ScalarExecuted. Each of these six method have a very similar signature. They each accept two arguments, DbCommand and DbCommandInterceptionContext<int>. The query or command (CommandText) that is being executed, as well as the parameters (Parameters) that are being passed to the database are within the DbCommand object. It is important to note that when a single command is executed, the xxxExecuting methods are being called before execution and xxxExecuted methods are called after execution. Unless you have a really, really good reason, I recommend using one or the other as the command text and parameters for before and after are going to be the same and will create twice as many log entries for no further information.

You might be wondering if you can get timings from  this information but, sadly, you cannot. Not without some additional work. You can probably figure that out on your own but it might be helpful to know that you can alter the query before it is executed and that same query will be there after execution so you could add a Guid to the call or even a timestamp and then after the call, find that information and use it to your advantage.

Next, we need to log the command text and parameters. You could choose to just print out everything including the parameters. In my case, I decided to substitute the parameter values in place of the parameters in the command text. Below is the method that handles that.

private void LogCommandText(DbCommand command, DbCommandInterceptionContext context)
{
    string commandText = command.CommandText.Replace(Environment.NewLine, " ");

    if(!string.IsNullOrEmpty(commandText.Trim()))
    {
        StringBuilder sb = new StringBuilder();

        if(command.Parameters.Count > 0)
        {
            for(int i = 0; i < command.Parameters.Count; i++)
            {
                DbParameter param = command.Parameters[i];

                string name = param.ParameterName;
                string value = "'" + param.Value.ToString() + "'";

                commandText = commandText.Replace("@" + name, value + " /*" + param.ParameterName + "*/ ");
            }
        }

        sb.AppendLine($"ENTITY_FRAMEWORK_QUERY -  Command_Text: {commandText}.");
    }
}

Then, to call this method, just make this simple change:

public void ScalarExecuting(DbCommand command, DbCommandInterceptionContext<object> interceptionContext)
{
    LogCommandText(command, interceptionContext);
}

You will also want to remove the throw new NotImplementedException()

blocks from the executing/executed methods, even if you aren’t implementing the logging feature in those methods.

Finally, the last thing to do is enable the Interceptor. This can be done in the web.config or app.config file in the <entityFramework>...</entityFramework>

section.

.

<interceptors>
  <interceptor type="Namespace.Goes.Here.With.Interceptor.Name, Project.Name.Goes.Here"></interceptor>
</interceptors>


ng-conf 2018 Review

I attended ng-conf 2018 from April 18 – April 20. Below are some of my thoughts. I will (mostly) stick to the meat of the conference, the content, but will stray into a few off topic areas. In an effort to be transparent, I think the conference was great and my goal here is to persuade you to attend next year.

Pros

  1. Everything Angular.
    I guess this one should be pretty obvious. Everything at the conference was about or at least touching on Angular. Where it is, what improvements have been made, the ecosystem around it, and what is in store for the immediate future. If your livelihood is Angular, you simply can’t afford to miss this conference.
  2. Great location.
    I had never been to Salt Lake City until now. It’s a great little city. The population of Salt Lake is about 200,000 and traffic just wasn’t a big deal from what I saw of downtown at any time of the day. I loathe attending conferences in major metropolitan areas and hope to never have to do it again. Salt Lake was a wonderful change.
  3. Access to speakers and experts.
    ng-conf is a 3 day conference preceded by 2 workshop days and on day 2 of the actual conference, all day long there were themed expert panels consisting of the speakers touching on topics like security, testing, performance, and typescript. Additionally, and new this year as I understand it, was the Tour of Heroes. This put you in a room with a couple of speakers and let you ask them questions. I saw a couple of the speakers sitting down with developers and troubleshooting issues. I thought this was pretty amazing to just be able to pick the brains of some of Angular’s most knowledgeable experts. Please keep this in the lineup. I do understand this might be a bit stressful for the speakers but this alone made the whole conference worth it.
  4. Community.
    It was strange. Every single person at the conference I spoke too just seemed to be in harmony with each other. I was not exposed to any negativity at all and I was very impressed.
  5. Rules.
    On the first day of the conference, the organizers laid down a few rules and they enforced them. Breaking the rules means you are out and not welcome back. I think it made everyone feel a little bit safer.
  6. Audio/Visual.
    As far as I could tell, these guys and gals were the unsung heroes of the conference. If you decided on one session instead of another, you were able to watch the missed session later. Most of the conference was broadcast over the Internet. The rooms were pretty booked on day one and three because there is only one track but if you were not able to find a seat or if you needed to actually get some work done, you could do so while watching the conference on a huge television.
  7. Speaker roster.
    Nearly everyone that is anyone in the Angular community was here delivering a session. The roster was pretty impressive.

Cons

  1. Location.
    Yeah, location is on both lists. It is not as easy for people on the east coast to get to Salt Lake. It is kind of out of the way of anywhere if you don’t live in or next to Utah.
  2. Hap-hazard scheduling.
    The schedule for day two was a bit scattered. Typically, there were several (as many as 4 or 5) sessions going on simultaneously and you are going to miss something no matter what. The staggered lengths of the presentations made it a bit chaotic. I had times with nothing that I wanted to see and times when there were 3 or 4 things I wanted to see. Chaotic.
  3. Communications.
    While the Tour of Heroes was great, I felt kind of bad for some of the speakers. Apparently, there was some kind of communication breakdown because a couple of speakers had absolutely no idea what the Tour of Heroes was about or what they were expected to do.

Overall, I loved ng-conf 2018 and I will plan on being there again next year.