The Observer Design Pattern in C#

The Observer design pattern is a behavioral pattern and was one of the original design patterns defined by the Gang of Four (GoF). The Observer pattern defines a relationship between a publisher, also known as a subject, and one or more subscribers, also known as observers. In this post, I will describe the pattern and show a sample implementation.

What Problem Does It Solve?

The Observer design pattern is very useful for situations that require push-based notifications. The subject doesn’t need to know about the implementation of the observers, it just needs to provide a way for them to subscribe and then notify the observers when some predefined condition, event, or state change occurs.

The Actors

For this post, I will create a fictional but simple price watching system. The system will only contain a single product and, using a timer, I will create random price fluctuations that will cause the price to either go up or down. I will also create a pair of observers with thresholds that will either buy or sell their stock based on price thresholds.

Subject – PriceWatcher

This class has three very important methods: AddObserver, RemoveObserver, and Notify. These three methods form the substance of the Observer pattern which is to manage the observers and notify them that something has changed. The rest will be completely different in every application but those three methods will be somewhat the same each time this design pattern is implemented.

Listing 1.1 – PriceWatcher.cs

public class PriceWatcher
{
    private Timer _timer = null;
    private double _currentPrice = 20d;
    private bool _direction = false;
    private List<IPriceObserver> _observers = null;

    public PriceWatcher()
    {
        _observers = new List<IPriceObserver>();

        _timer = new Timer(1006);
        _timer.Elapsed += TriggerPriceChange;
    }

    public void Start()
    {
        _timer.Start();
    }

    public void Stop()
    {
        _timer.Stop();
    }

    public void AddObserver(IPriceObserver observer)
    {
        _observers.Add(observer);
    }

    public void RemoveObserver(IPriceObserver observer)
    {
        _observers.Remove(observer);
    }

    public void Notify()
    {
        foreach(IPriceObserver observer in _observers)
        {
            observer.PriceChanged(_currentPrice);
        }
    }

    private void TriggerPriceChange(Object source, ElapsedEventArgs args)
    {
        _direction = !_direction;

        Random changeRandom = new Random(System.DateTime.Now.Millisecond);
        int change = changeRandom.Next(50);

        double priceChange = (double)change / (double)100;

        if (_direction)
        {
            if (_currentPrice - priceChange > 18.50d)
            {
                priceChange = priceChange * -1;
            }
        }
        else
        {
            if (_currentPrice + priceChange > 21.50d)
            {
                priceChange = priceChange * -1;
            }
        }

        if (priceChange != 0.00d)
        {
            _currentPrice = _currentPrice + priceChange;

            Console.WriteLine($"Price change triggered for {priceChange:c}. Current Price: {_currentPrice:c}");
        }

        Notify();
    }
}

Observer Contract – IPriceObserver

This interface forms the contract that all other PriceObservers must be implemented to be used by the PriceWatcher class. The implementation is very simple as the only real concern is that the PriceWatcher class must have some way to notify its observers.

Listing 1.2 – IPriceObserver.cs

public interface IPriceObserver
{
    void PriceChanged(double currentPrice);
}

Observer – PriceObserver

A rather simple implementation of the IPriceObserver interface. It monitors the price and if the price goes below a specific threshold, it will buy an item and if the price goes above another threshold, it will sell an item.

Listing 1.3 – PriceObserver.cs

public class PriceObserver : IPriceObserver
{
    private int _stockCount = 0;
        
    public void PriceChanged(double currentPrice)
    {
        UpdateStock(currentPrice);
    }

    private void UpdateStock(double currentPrice)
    {
        if(currentPrice > 20.5 && _stockCount > 0)
        {
            _stockCount--;
            Console.WriteLine($"Price Observer sold 1 item. Current Stock: {_stockCount}");
        }
        else if(currentPrice < 19.5)
        {
            _stockCount++;
            Console.WriteLine($"Price Observer bought 1 item. Current Stock: {_stockCount}");
        }
    }
}

How to Implement

The implementation is rather simple. To get it wired up, you create an instance of the PriceWatcher object and then add an observer.

Listing 1.4 – Implementation

PriceWatcher watcher = new PriceWatcher();
watcher.AddObserver(new PriceObserver());
watcher.Start();

Conclusion

The observer design pattern is both very useful and very simple. In today’s connected world, the possible uses and implementations are nearly endless. Anytime a Subject’s state changes, the Observers would probably need to know about it. The Observer pattern forms a very simple and elegant solution to this problem.

The Factory Design Pattern in C#

The factory design pattern is a widely accepted and well-regarded creational design pattern. It is one of the original 23 design patterns from the Gang of Four (GoF). The factory design pattern defines an interface for creating new objects instead of using the new keyword but allows classes that implement the interface to decide which class to instantiate. Simply put, the factory design pattern allows instantiation of new classes to be deferred until runtime.


What problem does it solve?

The factory design pattern really shines when used to farm out the creation of complex objects or replace code that is complex because of the many different types of objects that can be created. For example, if we are creating one of five different objects based on the value of a parameter, there would most likely be a case statement in place to test the possible values of that parameter and instantiate the correct class. This logic could easily be moved to the factory. Then, adding five more possibilities would not be such a large problem because the factory is in place and the only real change would be in the creation method.

For this demo, I want to create a factory that will give me a country object based on the name that I type in.

The Actors

Factory

An abstract class that defines the signature of the concrete factory.

Listing 1.1 – CountryFactory.cs

public abstract class CountryFactory
{
    public abstract ICountry CreateCountry(string countryName);
}

Concrete Factory

A class that implements the abstract factory signatures and handles the creation of objects.

Listing 1.2 – ConcreteCountryFactory.cs

public class ConcreteCountryFactory : CountryFactory
{
    public override ICountry CreateCountry(string countryName)
    {
        ICountry country = null;

        switch(countryName.ToLower())
        {
            case "brazil":
                country = new Brazil();
                break;
            case "canada":
                country = new Canada();
                break;
            case "china":
                country = new China();
                break;
            case "france":
                country = new France();
                break;
            case "india":
                country = new India();
                break;
            case "mexico":
                country = new Mexico();
                break;
            case "uk":
                country = new UnitedKingdom();
                break;
            case "usa":
                country = new UnitedStates();
                break;                    
        }

        return country;
    }
}

ICountry

An interface that defines the signature that all possible countries will be created by the concrete factory must adhere to.

Listing 1.3 – ICountry.cs

public interface ICountry
{
    string Name { get; }
    string GetLanguage();
}

Country n

Any number of objects that will be created by the concrete factory that adhere to the ICountry interface.

Listing 1.4 – Sample Countries

public class Brazil : ICountry
{
    public string Name
    {
        get
        {
            return "Brazil";
        }
    }

    public string GetLanguage()
    {
        return "Portuguese";
    }
}

public class France : ICountry
{
    public string Name
    {
        get
        {
            return "France";
        }
    }

    public string GetLanguage()
    {
        return "French";
    }
}

public class UnitedStates : ICountry
{
    public string Name
    {
        get
        {
            return "USA";
        }
    }

    public string GetLanguage()
    {
        return "English";
    }
}

How to implement

I created a simple console application that hands off control to the SampleDemo class listed below. The important thing is to create your factory.

Listing 1.6 – SampleDemo.cs

public class SampleDemo
{
    private CountryFactory _factory = null;

    public SampleDemo()
    {
        _factory = new ConcreteCountryFactory();
    }

    public void Run()
    {
        while (1 > 0)
        {
            Console.WriteLine("Enter the name of a country");

            string countryName = Console.ReadLine();

            if(countryName == "exit")
            {
                return;
            }

            ICountry country = _factory.CreateCountry(countryName);

            Console.WriteLine($"The official or dominant language of {country.Name} is {country.GetLanguage()}.");
        }
    }
}

Conclusion

The Factory Design Pattern, like other design patterns, is another tool in your belt and when properly implemented, can make your software simpler to write and easier to maintain. This implementation, while simplistic, is easy to extend to other object types.

A Beginner’s Guide to Creating Custom ASP.NET MVC HTML Helpers

Introduction

As a beginner, creating your own custom HTML Helpers might seem a bit daunting but it doesn’t have to be. Eventually, they boil down to simple HTML that all web developers are familiar with. In fact, HTML Helpers are very easy to create and the difficulty scales directly with the complexity of the problem you are trying to solve which is great news for the beginner. It means that you don’t have to learn a massive amount of information to start creating your own controls and your knowledge and sophistication can increase as you go.

What are HTML Helpers?

HTML Helpers are server-side extension methods that render HTML in the browser. They function like other extension methods by extending the functionality of System.Web.Mvc.HtmlHelper to enable our controls to function like the HTML Helper controls that are included by default in the MVC framework. This is exciting because the barrier to entry is so low. Anyone can create their own HTML Helpers or even entire libraries of helpers to be reused across many different projects.

Why Write Your Own?

There are several reasons you might want to create your own controls. Repetition or reuse comes to mind. If you find yourself creating the same functionality over and over, it might be a great candidate for a helper. For example, if you had to create a calendar in an application and needed to duplicate that calendar elsewhere in the same or different application, it would definitely be worthwhile to investigate converting that markup to an HTML Helper. Testability is another reason. Unit testing HTML Helpers is actually very simple because what comes out of the helper method is text in the form of an HtmlString.

Example: Custom Label Helper

It is quite easy to create your first custom HTML Helper. Here is a bit of sample code for an HTML Label control that accepts three arguments: the value of the control, the name of the control the label is tied to, and CSS classes to be applied to the control.

public static class LabelHelpers
{
  public static HtmlString CustomLabelFor(this HtmlHelper html, string text, string controlName, string cssClassName)
  {
    StringBuilder sb = new StringBuilder();

    sb.Append("<label");
    
    if(!string.IsNullOrEmpty(controlName))
    {
      sb.Append($" for='{controlName}'");
    }

    if(!string.IsNullOrEmpty(cssClassName))
    {
      sb.Append($" class='{cssClassName}'");
    }

    sb.Append($">{text}</label>");

    return new HtmlString(sb.ToString());
  }
}

As you can see, both the LabelHelpers class and the CustomLabelFor method are static. Additionally, because the method is an extension method, we are able to use the helper without instantiating, just like HTML Helpers built into the MVC framework. Through the method, we methodically build out the HTML required to render the label control in the page correctly.

Usage, then, becomes very simple.

<div class="row">
    <div class="col-md-12">
        @Html.CustomLabelFor("Hello", "World", "col-md-3")
        @Html.TextBox("World")
    </div>
</div>

Conclusion

This example is extremely simple. However, more sophisticated controls follow the same concept. You are simply building the HTML necessary for the control to render. It doesn’t really matter if this is a label or a calendar control. Approach the job of building your control systematically by tearing down the requirement piece by piece until you get to a point where you can immediately finish a small part of the requirement and build on that small part. Repeat until the control is completed.

Software Development Basics – Object-Oriented Programming

Life is complex. Developing software is complex. When creating software that models life, a paradigm is needed to break that complexity down into something that we can comprehend and that can eventually be implemented into a computer program. Object-oriented programming or OOP is one of the best known and most practiced paradigms available.

There are four main tenets or concepts that serve as pillars for object-oriented programming.

  1. Encapsulation
  2. Abstraction
  3. Inheritance
  4. Polymorphism

Each of these concepts deserves its own post. Entire libraries of books have been written about OOP and trying to do it justice in a single post is absurd. However, explaining these concepts very plainly is possible without a lot of detail.

Introduction

It is important to know that OOP is language agnostic and will apply to any object-oriented programming language. The list of languages that are object-oriented is vast. It would be much easier to determine which languages are not object-oriented. It is also very important to note that languages that were not originally object-oriented such as PHP and JavaScript have moved toward supporting the object-oriented paradigm. This is important for a couple of reasons.

First, a language that fails to evolve will eventually fade away into obscurity. Ask Cobol about obscurity. 50 years ago, Cobol was an incredibly popular language. There are still tens of thousands of applications written in Cobol that are actively maintained at great expense. Today, very, very few businesses are creating new software in Cobol. It is a bad situation. Companies have to invest in keeping the legacy software running but that investment isn’t paving the way for the future. Typically, the same programmers maintaining Cobol don’t also know Java or C#. It happens but not often.

Second, it tells us that the object-oriented paradigm is making progress. It is extremely popular. You will see plenty of articles and books discussing OOP. More importantly, you will find many programs using the paradigm.

What is Object-Oriented Programming?

OOP is the act of modeling real-life objects. Real-life objects can be anything. It can be physical things like a car, house, book, person, or tree. It can also be conceptual things like an account, sale, idea, or lawsuit. Literally, anything in life can be modeled. In OOP, these objects and the data that makes up these objects are given real importance.

Classes are the basic building blocks of OOP. Not all classes are objects but all objects are classes. Classes are the building blocks of OOP. Objects are classes with state in the form of properties or attributes, and behavior. For this post and many other examples on the Internet, we will use vehicles in this example.

Encapsulation

Encapsulation is the act of hiding or protecting data or methods of an object. In the vehicle example, the speed of the vehicle could be a private variable. Methods like Stop and Go would effect the speed and might be the only way to modify the speed value.

Abstraction

Abstraction is the process of hiding details about the implementation of an object. Let’s go back to the Go method. In order to use that method, you don’t need to know or understand all that is going on behind the scenes of the Go method. That is because the implementation details have been abstracted away from consumers.

As you might have already noticed, abstraction and encapsulation are very closely related.

Inheritance

Inheritance allows us to have multiple vehicle types such as car and bus. Imagine all the differences between a car and bus. There are many. They both have engines, tires, models, manufacturers, and dozens of other small things. However, there are also many similarities. Inheritance allows us to have a hierarchy of objects that trace back to a single parent and each child ‘inherits’ the properties and methods on the parent and adds their own properties and methods. This hierarchy is inheritance.

Polymorphism

Polymorphism is related to Inheritance. Polymorphism allows child objects to keep parent attributes and define their own. This takes two shapes. Let’s assume that the Go method in the base vehicle class is a simple implementation. The vehicle’s Go method might be exactly the same for some versions of the vehicle such as a car and a bus but the Go method might look very, very different for a plane. In fact, a plane’s Go method might be to actually call a private method named Fly. This is polymorphism. Polymorphism actually means many forms and you can probably see why. There is a caveat, however. This is truly a simplistic explanation of polymorphism but it should give you a basic understanding of the concept.

Conclusion

Hopefully this post will give you a basic understanding of object-oriented programming, especially if you haven’t seen it or tried to understand it before. I will review each of the four pillars in greater depth later on.

The World through the Lens of a New Engineer

I have been spending a lot of time lately trying to see the world through the lens of a new software engineer. It is difficult because I need to forget everything I know and approach the task of developing software as someone that has never written a line of code. This is not purely an educational pursuit. I am trying to developing a learning plan for people who are interested in becoming a software engineer from scratch for Edumacate.me.

What came first? The chicken or the egg? Or, general knowledge of software engineering or pick a programming language?

My brain tells me that you simply have to pick the tenets of software engineering first like object-oriented programming but object-oriented programming really only makes sense when you are writing code. If you are now thinking about a car or animal analogy, give it a break. An analogy like that really only makes sense when you are writing relevant code. At least to me, that is the way it works. Imagine trying to wrap your head around how an analogy like this works if you have never written a line of code.

However, the base knowledge of software engineering should transcend any programming language that you pick but things go a lot easier while learning programming if you have a tool to apply that knowledge. It actually makes more sense to learn the base programming knowledge first, even if it is harder, because it is language-independent. No matter which language you pick, it will apply. Knowledge like object-oriented programming, software architecture, algorithms, and design patterns. This information will also make a much longer-lasting difference in your career because this knowledge will change the way you think and the way you develop software. It should be pretty obvious by this point which direction I am leaning when it comes to the approach to take.

Sadly, this isn’t the biggest problem facing prospective engineers and the problem is getting worse every year. The sheer amount of knowledge you have to accumulate in order to be a successful software engineer is increasing at a pretty quick rate. You can still get by with less but to make it as a professional, that breadth is increasing.

I am going to use the ASP.NET MVC paradigm because it is what I am most familiar with but it will be very similar regardless of server platform and language. Keep in mind that I am drawing some conclusions here based on developing a semi-sophisticated web-based application using somewhat accepted best practices. For the front end, you will need to know HTML 5 and CSS 3.  Because it would be expected that you would develop a responsive website, you would also need to know Bootstrap or a similar CSS framework. You would also need to know at least basic JavaScript or, more likely, the rudimentary elements of jQuery.

On the server, you would need to know C# and how the MVC framework works. Since this is a sophisticated application, we are likely going to be dealing with data, we will need to know a data access technology like ADO.NET, Entity Framework, or LINQ2SQL. This will likely also require some knowledge of a relational database management system like SQL Server or Oracle.

Now, for the tools. You would need to know Visual Studio. You would also need to have at least a basic understanding of IIS. To use SQL Server, you would need a client like Enterprise Manager (Visual Studio also has this available in Server Manager).

Professionally, a developer would be expected to know a Source Control management system like Team Foundation Services or GitHub and a development process like Agile or Scrum.

Hopefully, this post will give you a decent understanding of what new engineers face. Learning to code is just the beginning.

Repository Design Pattern in C# Part 2

This is part two of a two part series. The first post covers the thought process that I often go through when implementing the repository design pattern. This post will show a complete implementation.

I want to start by saying that I don’t really have a preference as to whether repositories should be coarse-grained or fine-grained. However, I do find that fine-grained repositories are easier to test because the logic layer is a bit thinner but both are equally as effective. On the flip side, a fine-grained repository means your contract is constantly changing because the interface must be updated with each new change so it easier to implement. Pick your poison.

First, let’s go through a fine-grained implementation.

public class CustomerRepository : ICustomerRepository
{
    private OrderTrackerDbContext _context = null;

    public CustomerRepository()
    {
        _context = new OrderTrackerDbContext();
    }

    public IQueryable<Customer> GetAllCustomers() => _context.Customers;

    public Customer GetCustomerByID(int id) => GetAllCustomers().SingleOrDefault(c => c.ID == id);

    public Customer GetCustomerByName(string name) => GetAllCustomers().FirstOrDefault(c => c.Name == name);

    public void Add(Customer customer)
    {
        _context.Customers.Add(customer);
        SaveChanges();
    }

    public void AddRange(List<Customer> customers)
    {
        _context.Customers.AddRange(customers);
        SaveChanges();
    }

    public void Delete(Customer customer)
    {
        _context.Customers.Remove(customer);
        SaveChanges();
    }

    public void DeleteRange(List<Customer> customers)
    {
        _context.Customers.RemoveRange(customers);
        SaveChanges();
    }

    public void Update(Customer customer)
    {
        _context.Entry<Customer>(customer).State = EntityState.Modified;
        SaveChanges();
    }

    private void SaveChanges()
    {
        _context.SaveChanges();
    }
}

Note that there are several different GetCustomerxxx methods. This makes the repository more verbose but, like I mentioned earlier, easier to test. This will also keep your business logic layer a bit cleaner because you don’t have to construct where clauses but it comes at the expense of having sometimes enormous contracts.

Now, for the coarse-grained implementation.

public class OrderRepository : IOrderRepository
{
    private OrderTrackerDbContext _context = null;

    public OrderRepository()
    {
        _context = new OrderTrackerDbContext();
    }

    public IQueryable<Order> GetOrders(Expression<Func<Order, bool>> predicate) => _context.Orders.Where(predicate);

    public void Add(Order order)
    {
        _context.Orders.Add(order);
        _context.SaveChanges();
    }

    public void AddRange(List<Order> orders)
    {
        _context.Orders.AddRange(orders);
        _context.SaveChanges();
    }

    public void Update(Order order)
    {
        _context.Entry<Order>(order).State = EntityState.Modified;
        _context.SaveChanges();
    }

    public void Delete(Order order)
    {
        _context.Orders.Remove(order);
        _context.SaveChanges();
    }

    public void DeleteRange(List<Order> orders)
    {
        _context.Orders.RemoveRange(orders);
        _context.SaveChanges();
    }
}

This is a somewhat simpler approach. Only the bare minimum is there. In order to really compare apples to apples, I am including the OrderLogic class here as well. It only seems fair. You have to be fine-grained at some point and the logic class is where it happens with this second implmentation.

public class OrderLogic
{
    private IOrderRepository _orderRepo = null;

    public OrderLogic(IOrderRepository orderRepo)
    {
        _orderRepo = orderRepo;
    }

    public IQueryable<Order> GetCustomerOrders(int customerId) => _orderRepo.GetOrders(o => o.CustomerID == customerId);

    public IQueryable<Order> GetCustomerOrdersForDateRange(int customerId, DateTime startDate, DateTime endDate) 
        => GetCustomerOrders(customerId).Where(o => o.OrderDate >= startDate && o.OrderDate <= endDate);

    public IQueryable<Order> GetCustomerOrdersForYear(int customerId, int year)
    {
        DateTime startDate = DateTime.Parse($"1/1/{year}");
        DateTime endDate = DateTime.Parse($"1/1/{year + 1}").AddMilliseconds(-1);

        return GetCustomerOrdersForDateRange(customerId, startDate, endDate);
    }

    public Order GetOrderByID(int orderId) => _orderRepo.GetOrders(o => o.ID == orderId).FirstOrDefault();
}

There you have it. Two different approaches to the same design pattern. Hopefully, you will learn something from this post, have a better understanding of how to go about the implementation, and will create cleaner applications in the future. The repository design pattern is very popular for a reason, it is super simple to implement. Have fun!

Repository Design Pattern in C# Part 1

This is part one of a two part series. This post covers the thought process that I often go through when implementing the repository design pattern. The next post will show a complete implementation.

The repository design pattern has become very popular in the .NET ecosystem in recent years mainly because it is a simple data access abstraction that can be easily implemented, easily tested, and easily built on top of Entity Framework, LINQ2SQL, and other ORMs. In this post, I will walk you through the implementation of the repository design pattern in C#.

Before getting started, it is important to understand that while there is not a set way a repository must look, there is an expectation on how the repository should behave. When designing my own repositories, I try to keep the rules listed below in mind.

  1. Repositories access and manipulate data. This includes CRUD operations.
  2. Repositories do not contain any business logic.
  3. Repositories can provide statistics like counts.
  4. Repositories can filter data.
  5. There isn’t a limit on the number of methods on a repository.
  6. One object per file. If you have two different objects in your model (ie Customers and Orders), you should have two different repositories (CustomerRepository and OrderRepository).

It is also worthwhile to examine some of the pros and cons of the repository pattern.

Pros

  1. Repositories should be bound to interfaces which makes them easily testable.
  2. Provides a single source of data manipulation. This supports DRY (don’t repeat yourself) leaving you with a cleaner code base.
  3. Provides an easy route to separation of concerns. All data access code is in a single set of classes and doesn’t spill over into other classes.

Cons

  1. Is yet another layer of abstraction in our code which complicates understanding and can sometimes hide problems.
  2. To be effective, you have to compromise in either readability (many methods) or functionality (generic repository – I almost always compromise on readability because I hate testing generic repositories).

Before implementing this pattern, I suggest you sit and think about some of the decisions you will be making.

  1. Will you return nulls for methods that do not have a valid return value? This impacts the code you write because if you are going to allow nulls, you probably have to write some code in your calling methods to check for that return value being null. If you aren’t going to allow nulls, you have to catch exceptions.
  2. Will your repositories be fine grained or coarse grained? This will have a major impact on how thin your repositories are. If you are going for coarse grained, you can probably adhere to a common interface across different repositories while not doing the Generic Repository pattern. If you are going fine grained, you will likely have larger repositories, more interfaces, and less data-centric code in your logic. I will show an example of both below.


Fine Grained

public interface ICustomerRepository
{
    void Add(Customer customer);
    void Delete(Customer customer);
    IQueryable<Customer> GetAllCustomers();
    Customer GetCustomerByID(int id);
    void Update(Customer customer);
}

In a true repository, you might have 5-10 or even more methods to retrieve the data you are after for any given calling method. You might also want to pass in an entire list of customers to add or delete.

Coarse Grained

public interface IOrderRepository
{
    void Add(Order order);
    void Delete(Order order);
    IQueryable<Order> GetOrders(Expression<Func<Order, bool>> predicate);
    void Update(Order order);
}

This allows an entire where clause to be passed in to return data. This flexibility comes at a cost, however. That where clause has to be constructed somewhere and might end up in your business logic.


Since the repository pattern allows for some flexibility, it is very helpful to have some thought process before and during implementation. In the next post, we will do just that and create an implementation for both of the interfaces listed above.

5 Must Know Visual Studio Tips and Tricks

Visual Studio is an extremely large program. You are very unlikely to use even half the features of the program during your career. It is a tool that is very easy to learn and very difficult to master. Here are 5 tips that will help you move in the right direction.

  1. ALT + B + U
    The ALT + B + U keyboard shortcut will build the current unit (project). A real time saver compared to build solution and you don’t have to move from your place in the code editor.
  2. ALT + Drag
    This little trick is a true time saver. If you hold down the ALT key and click and then drag up or down, you select the rectangle you drag. Then, you can start typing and the text will be inserted into every line you have selected. Here is a bonus tip but not for Visual Studio. In Code, hold down the ALT key and click in random locations in your document and this same behavior occurs. You can even do multiple locations on the same line. Amazing.
  3. Track Active Item in Solution Explorer
    I can no longer function without this one. I have been using it since VS 2010, I believe. From the menu, Tools > Options > Projects and Solutions > General. If you turn the Track Active Item in Solution Explorer option on, when you change documents in the editor, it will automatically move you to the correct location in Solution Explorer.
  4. Tab Management
    Tabs have their own context menus. Right clicking a tab will allow you to perform several special actions including Close All Documents, Close All But This, New Horizontal Tab Group, and New Vertical Tab Group. No more closing 40 tabs one by one.
  5. Paste Special
    I only recently learned about this little trick. If you copy a JSON or XML structure, you can paste it as a class!!! In the menu, Edit > Paste Special > Past JSON as Classes / Paste XML as Classes.


Well, that is a small list of some of my favorites. What are yours?

Beginner’s Guide to Using Log4NET in an ASP.NET MVC Application

Logging is an integral part of any application. There are many options and not all of them good. Log4NET is a great framework for both simple and extremely complex scenarios, allowing you to choose the log format, the storage medium, and custom rules for messages and levels. Creating new message handlers is an easy process and Log4NET can be configured quite easily via config files, allowing you to change the configuration without requiring a recompile and deploy.


NuGet

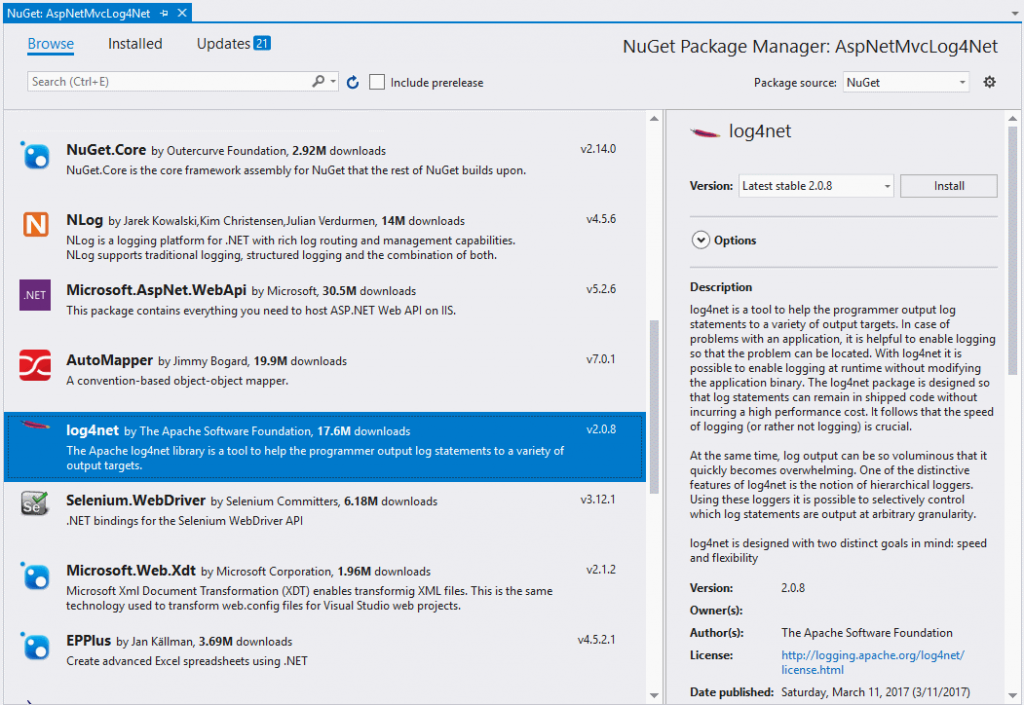
Start by adding a reference to Log4NET in NuGet.

Global.asax.cs

In the Application_Start method in the Global.asax.cs file, we need to call the Configure method. The Configure method has 10 different overloads but we are only interested in the default. Some of the more useful overloads allows you to pass in a configuration file, the URL of a configuration file, and a code repository.

log4net.Config.XmlConfigurator.Configure();

Configuration

Next, we have to add the configuration to the web.config file. Everything here goes inside the <configuration>...</configuration> tag.


<configSections>  
  <section name="log4net" type="log4net.Config.Log4NetConfigurationSectionHandler, log4net" />  
</configSections>  
   
<log4net debug="false">  
  <appender name="LogFileAppender" type="log4net.Appender.FileAppender">  
    <param name="File" value="C:\log\testlog.log" /> 
    <layout type="log4net.Layout.PatternLayout">  
      <param name="ConversionPattern" value="%d [%t] %-5p %c %m%n" />  
    </layout>  
  </appender>  
  <root>  
  <level value="All" />  
    <appender-ref ref="LogFileAppender" />  
  </root>  
</log4net>

Usage

Finally, we can use it. You can append this in an action result in this way.

log4net.ILog logger = log4net.LogManager.GetLogger(typeof(HomeController));

logger.Error(new InvalidCastException("Division by zero"));


That’s all there is to it.


ASP.NET MVC Bundling and Minification for Beginners

Starting in version 4, ASP.NET MVC has been capable of bundling script and style files and minifying them to help make sites faster. Bundling and minification is not a black box. Its easy to see what is going on using only your browser. The image below is a default MVC application that has not been bundled.


Without Bundling and Minification

Without bundling, every CSS and JS file that is being used, a separate HTTP request is issued. Keep in mind that this is a very small list. Your applications are likely to have many, many more files, especially JS files. There could hundreds. This would not be uncommon for large-scale applications.

There is only one situation where this is ideal. If you are debugging.

With Bundling and Minfication

If we look at App_Start\BundleConfig.cs file, there are five default bundles built for us. One for jQuery, one for jQuery Validation, one for modernizr, one for bootstrap, and one for the css files. By default, the jQuery Validation bundle is not used. We go from six requests for CSS and JS files to four. However, look at the size of the files. jQuery is roughly 33% of it’s uncompressed size and Bootstrap is about 50%. This alone should be enough to sell you on the virtues of bundling and minification. If not, though, again picture the scenario that has hundreds of files. The time that is saved, and the smaller sizes leads to massive performance improvements. This will definitely create the perception of a better application and that perception wins clients and earns money.

But what is going on here? First, the files that are linked in the Bundles are downloaded as a single file instead of multiple files. This means fewer HTTP requests. Second, when possible, a minified version of the files are used instead of their uncompressed counterparts. Minified files have all possible whitespace removed and the smallest variable names possible. Most open source and commercial CSS and JS files have a minified version already built for you and those files are used instead of their uncompressed versions. If you look in the scripts folder, you will see bootstrap.js and bootstrap.min.js. The min file is the minified version. There are also versions for jQuery, jQuery Validation, and respond.js.

Using Bundles

The best way to enabled or disable bundling and minification is by modifying the debug value in the setting below in the system.web element of the web.config file.

<compilation debug="false" targetFramework="4.6.1"/>

You can toggle this setting on or off in the BundleConfig.cs file as well but that value will be over-ridden by the web.config file so why bother?

Using a bundle is very easy. In your layout or other cshtml file, using code similar to the below will allow you to use your own bundles.

@Styles.Render("~/Content/cssbundle")
@Scripts.Render("~/bundles/jsbundle")

What to watch out for

There are a couple of gotchas. First, you should keep the path to your bundles consistent to their location. For example, if you have a css file in the \Content\css folder and that css file has a reference to another css file in that folder, you will want to make sure the name of your bundle is ~/content/css/your_file_name_here or it won’t be able to find it. Second, be mindful of how you are bundling your files. Even a lazy loaded system such as Angular will download everything in a bundle, regardless of whether or not it is needed or not.

Conclusion

As the size of web apps continue to grow and grow and stretch every boundary, the value of Bundling and Minification continues to go up as well. Put it in your toolbox and use it. You should be able to do that now.