Working with Nullable Types in C#

Nullable types were a great addition to C#. They were added way back in C# 2.0 but there is still confusion on how to work with them for some developers, especially junior developers. In this post, I will provide an overview of the most efficient ways to work with them and use them correctly.

What are Nullable Types?

Nullable types are simply a type in the common type system (CTS) that can either have a value or be null. This is supported for most of the basic types in the .NET framework such as integer, GUID, double, decimal, single, DateTime, etc. I find it most helpful to think of nullable types as a wrapper around a type. I will explain why.

How are Nullable Types Used?

Nullable types must be instantiated with the question mark identifier.

Listing 1.1 – Nullable type example

int? counter;

The value of a nullable variable is actually stored in the Value property. Remember what I said about nullable types being a wrapper around a type?

Listing 1.2 – Retrieving the value of a nullable variable

Console.WriteLine($"Counter: {counter.Value}");

Before accessing that value, however, you should always check that it has a value with the HasValue property. Since the variable is nullable, you will receive an InvalidOperationException if you try to access the Value property and it is null.

Listing 1.3 – Testing the value of a nullable variable

if (counter.HasValue)
{
    Console.WriteLine($"Counter: {counter.Value}");
}

Finally, because the Value property is read-only when assigning a value to the nullable variable, it is assigned directly to the variable, not the Value property.

Listing 1.4 – Assigning a value to a nullable variable

counter = 12;

Conclusion

Nullable types are a cleaner way to write code when used appropriately. They help you avoid testing for default values in your applications which is a definite anti-pattern. Instead, they offer a much cleaner way to perform the same type of function. They offer a layer of simplicity and are simple to use after understanding the concepts discussed above.

A Brief Introduction to ASP.NET Core Middleware

One of the many changes that came with ASP.NET Core is a completely new model for the request pipeline. It is great, though, because it allows complete customization of how requests are handled in your application and there is an out-of-the-box solution for basic applications. Simple needs are serviced if the requirements are simple and the pipeline can be as complex as the requirements warrant.

General Overview

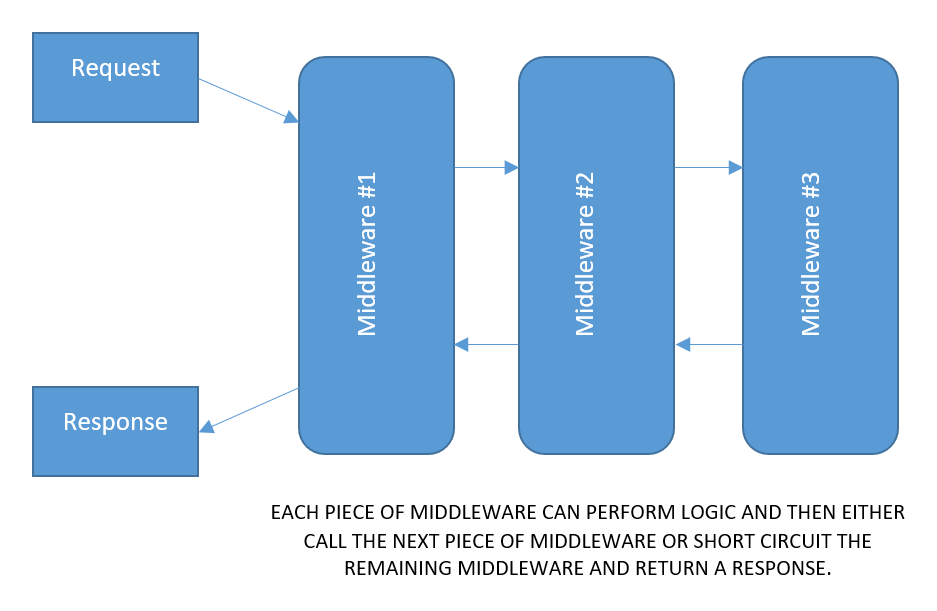
The ASP.NET Core request middleware is more commonly known as middleware. Middleware is configured to handle requests in a sequenced matter, going from one component of middleware to another. At any time a component can return the request and not pass it along to the next component. When a request is returned, however, it passes back through each previous middleware component in the opposite order. So, the last component it passed through on the way in, is the first it must then pass back through on its way out.

Figure 1 – Middleware

There are several middleware components available for use in your applications that are available as part of the ASP.NET Core installation. This is a non-comprehensive list but includes some of the most common to handle standard application scenarios.

Table 1 – Common Middleware Components Included with ASP.NET Core

Type

Method

Description

DeveloperExceptionPage UseDeveloperExceptionPage() Provides a detailed exception page if the application is running in development mode.
DatabaseErrorPage UseDatabaseErrorPage() Provides a detailed instruction page if the application requires Entity Framework migrations to be ran with instructions on possible actions.
ExceptionHandler UseExceptionHandler() Allows you to redirect to a specific error page when unhandled exceptions are encountered. Will also log the exception and re-execute the request if the response has not been started.
HSTS UseHsts() Adds a header for the Strict-Transport Security header.
HTTPSRedirection UseHttpsRedirection() Redirects HTTP traffic to HTTPS.
StaticFiles UseStaticFiles() Returns static content such as HTML, JavaScript, images, CSS, etc that do not need to be executed on the server.
CookiePolicy UseCookiePolicy() Adds cookie policy validation to the application.
Authentication UseAuthentication() Adds identity functionality such as authentication and authorization.
MVC UseMvc() Adds MVC routing and serving functionality to the application.

Custom Middleware

The requirements for developing your own custom middleware components are surprisingly simple. First, the constructor of the middleware should accept a RequestDelegate argument. The middleware you are developing may require more such as the IHostingEnvironment or ILoggingFactory interfaces but at the bare minimum, the RequestDelegate is required. Second, a public asynchronous method that returns a Task object named Invoke. The invoke method should accept an HttpContext argument. The Invoke method should be sure to call the next component in the chain via the Next argument of the constructor but as for requirements, that is it. Let’s take a look at a quick example.

A Simple Implementation

Listing 1 – SampleMiddleware.cs

public class SampleMiddleware
{
    public SampleMiddleware(RequestDelegate next)
    {
        _next = next;
    }

    private RequestDelegate _next = null;

    public async Task Invoke(HttpContext context)
    {
        int dayOfYear = DateTime.Now.DayOfYear;

        context.Response.Headers.Add("X-DayOfYear", new[] { dayOfYear.ToString() });

        await _next(context);
    }
}

This is everything that is required for a new middleware component. In the constructor, I am saving a reference to the next RequestDelegate so it is available later in the Invoke method. In the Invoke method, I am simply adding a new header to the response that will have the day of the year as the header value and then calling the _next request delegate.

Listing 2 – Startup.cs

app.UseMiddleware<SampleMiddleware>();

Add this line to the Configure method of the Startup.cs file.

Figure 2 – Results

Conclusion

The ASP.NET Core Middleware, or request pipeline, is wildly different than what we may be accustomed to in ASP.NET 4 but it does offer much greater control and is something we should happily embrace. It is not difficult to create our own pipeline components and in this post, we did just that however simple the example.

Working with Strings in C#

Strings and string manipulation are a complex and a much larger topic than it appears on the surface. There are many different complicated scenarios when using strings and their very nature is often misunderstood.

What makes strings different?

Strings are immutable which means they are read-only. When you alter a string in any way, behind the scenes, the .NET framework creates a new copy of the string with the modified value and the old version is sent to garbage collection. This is dangerous for a couple of reasons. If you have a string that has one million characters and you alter that string in a loop ten times, you now have sent ten different strings of at least one million characters to garbage collection. Also, since strings are a reference type and not a value type, they can be slower to work with so altering them many times can be a slower operation than you might expect.

Strings are an important storage mechanism for just about every application so there are options available to help get around the possible performance issues.

First, there is the StringBuilder object. The string builder is not immutable, which means that modifications to the string value inside the StringBuilder does not create a new instance each time. The StringBuilder object handles this by creating a buffer that can handle expansions to the string. When you modify the string, if the buffer can handle the modification, it does so. Otherwise, a new, larger buffer is created. Proceed with caution, however. You should not just always replace string with StringBuilder while coding. Small strings are faster than the StringBuilder. Choosing the StringBuilder over the string should be restricted to larger strings and strings that are manipulated many times, such as in a loop.

Second, the compiler is smart and handles the manipulation of strings in the most intelligent way possible. We will discuss that next but for now, the example below will illustrate how the compiler handles the creation of a string.

string someValue = "My dog " + name + " is " + age.ToString() + " years old and is a " + adjective + " pet!";

How many strings are created in the above example? If you said anything other than 1, you would be wrong. One string is created because the compiler knows how to handle that situation without creating seven different copies. This is a common scenario and, like I said, the compiler is smart. What about the example below?

string someValue = "My dog ";
someValue += name;
someValue = someValue + " is ";
someValue += age.ToString();
someValue = someValue + " years old and is a ";
someValue += adjective;
someValue += " pet!";

In the above example, there are seven different strings created. The semicolon is a stop statement so the compiler stops, compiles, and then moves on. The example uses two different methods of manipulation: += and = … +. They are the same, however.

Methods of string manipulation

There are several different methods of string manipulation available to us that can make working with strings a very nice experience. The joy of the experience, however, is dependent on the method used.

String concatenation

String concatenation has been used in both examples above. You are adding one string to another. Both += and =…+ are examples of string concatenation. While string concatenation has been around since the very beginning, it is my least favorite method to use for any scenario where I need to combine more than three or four different strings or if there is punctuation involved. It feels like an uphill battle.

String.Format()

String.Format() is a much cleaner method for complicated manipulations.

string someValue = string.Format("My dog {0} is {1} years old and is a {2} pet!", name, age, adjective);

String.Format() allows you to create the string using indexed placeholders ({0}, {1}, {2}) which correspond to list of variables (name, age, adjective). I prefer this method over string concatenation because it allows me to write the string in a more natural state without worrying too much about spacing and punctuation. It feels like a more natural flow.

String Interpolation

String interpolation is similar to string.Format() but is even more natural.

string someValue = $"My dog {name} is {age} years old and is a {adjective} pet!";

String interpolation allows a similar experience to string.Format() but rids us of the indexed variables and instead allows us to just insert the variables directly into the string. In nearly all cases, I prefer interpolation over format. It just feels better using it. The dollar sign is what allows interpolation to work. It must immediately precede the opening double quote.

Escape Sequences

There are times when you may need for items that are otherwise not allowed to be in your string. For example, you might want to add double quotes around the dog’s name in the examples so far. You do this with an escape sequence.

string someValue = $"My dog \"{name}\" is {age} years old and is a {adjective} pet!";

The backslash character is an opening escape character. It forces the compiler into ignoring or escaping the very next character, the double quote. In this case, the double quotes around the name variable will be displayed. Please note that the backslash character is an escape sequence whether or not you intend it that way. This is why you will see four backslashes for a network path. The first is ignored, the second is not, the third is ignored, the fourth is not.

You can find a list a list of the valid escape sequences here.

Conclusion

Strings are a strange beast in the .NET framework and it pays to understand them as much as possible to keep from feeling like you are fighting a battle when using them beyond the simplest scenarios. However, the .NET framework gives us great tools for dealing with them if you take the time to learn about those tools.

Events and Delegates in C#

Events and Delegates are two topics in the .NET Framework that are truly misunderstood and many times not understood at all. This post will attempt to explain what events are, how they are related to delegates, and how to use them in your code.

What Are Events?

Events are a way for objects in the .NET Framework or your own classes to notify other classes or objects when something happens. Events follow the subscribe/unsubscribe model and it is valid to do so during runtime, not just compile time.

What Are Delegates?

Delegates are inseparable from events but are not events. It is an important distinction. A delegate represents a reference to a method with a pre-defined parameter list and return type. Delegates are assigned to events when instantiated and the signature of the delegate must match the signature of the event. Delegates are the foundation for events.

A Simple Example

In case the concept is not clear in your mind, here is a short example. This example will perform the outcome of the FizzBuzz test. A loop will increment a counter from 1 to 100. If the counter is a multiple of 3, it will print Fizz. If the counter is a multiple of 5, it will print Buzz. If the counter is a multiple of 3 and 5, it will print FizzBuzz. Otherwise, it will print the counter.

Listing 1.1 – Program.cs

class Program
{
    static void Main(string[] args)
    {
        FizzBuzz fb = new FizzBuzz();
        FizzBuzzDelegate dlg = new FizzBuzzDelegate(fb.DefaultFizzBuzzPrinter);
        fb.OnCounterChanged += fb.GetFizzBuzzValue;

        for(int i = 1; i <= 100; i++)
        {
            dlg(i);
        }

        Console.ReadKey();
    }
}

The code in Program.cs wires everything up and then performs the loop for the counter. Notice that the delegate is what is actually called, not the event.

Listing 1.2 – FizzBuzz.cs

public class FizzBuzz
{
    public delegate string FizzBuzzDelegate(int counter);
    public event FizzBuzzDelegate OnCounterChanged;

    public string DefaultFizzBuzzPrinter(int counter)
    {
        string output = string.Empty;

        if (OnCounterChanged != null)
        {
            Console.WriteLine(OnCounterChanged(counter));
        }

        return output;
    }

    public string GetFizzBuzzValue(int counter)
    {
        string counterOutput = $"{counter} ";

        if (counter % 3 == 0)
        {
            counterOutput += "Fizz";
        }

        if (counter % 5 == 0)
        {
            counterOutput += "Buzz";
        }

        return counterOutput;
    }
}

The most important thing here is the way the event is triggered. The delegate calls the event.

Conclusion

Events and delegates are not as difficult as you might think. However, they are rarely used and that adds to their mystique. In practice, they are very simple because they follow a very small set of rules.

The Crazy Dangers of Overcommitment

I am always horrified and somewhat amused at how we (I) become overcommitted. It happens to me far too often and there are a couple of really simple reasons why. While the reasons may be easily understood, they are not nearly as easy to control.

Popular Reasons We Overcommit

First, saying yes is very easy. Saying no is very hard. There really isn’t any middle ground. If someone attempts to get you to commit to something, anything, there are only two different responses: No and Yes. Saying anything but NO! is hard because it is uncomfortable. Saying yes validates the person asking for help while saying no is a rejection of that person. This is a very easy motivation to understand. It takes a lot of courage and strength to say no but far too often, we waffle. We say maybe. Or we say ask me tomorrow. Anything but a No answer is a Yes answer. Eventually, you will have to either deliver or have yet another uncomfortable conversation which will again lead to Yes or No because the person asking isn’t likely to forget that you said maybe (yes). Until you say a firm no, it is a yes.

Second, we have to pull our own weight, even if you are already towing a tanker behind you. Not everyone is inflicted with this terrible disease. I am sure you have met those that are more than willing to let you shoulder their burden and your own. However, those people are not the target of this post. This is another of the uncomfortable reasons we are overcommitted. We have a hard time admitting to ourselves that we have enough on our shoulders. We just have to keep picking up the slack until we are crushed or we just throw everything on the ground and say no more.

Third, we are afraid. Before you laugh, please understand what I mean. No one is going to say ‘Hey, I should pick up that boulder so I don’t reach my goals’. No, our minds are far too sophisticated for that. Instead, subconsciously, our minds are protecting us from that crushing feeling of failure and from knowing that despite our best intentions and our best effort we simply failed to accomplish the goals we had set for ourselves. This protection allows us to blame anything or anyone other than ourselves for the failure.

How To Avoid Overcommitting

There are several tactics that you can employ to get out of the dreadful state of overcommitment. First, you have to recognize the signs that you are overcommitted and those signs will not be the same for everyone. You may be spending more time working but achieving less. This may be caused by juggling too many balls or feeling overwhelmed. You may be sacrificing exercise or sleep to achieve just a bit more. This is a ridiculous state to be in. You cannot cheat yourself when it comes to exercise and sleep. Eventually, you must pay the piper. The key is to recognize when you are overcommitted and then take steps to relieve the burden. When you become aware that you are overcommitted, then your answer for any request should be no. This takes a mountain of strength and courage but this should be a safe thing to do at any reasonable place of employment, even if it is for yourself.

You must know what is important to you. If nothing is important, everything is important. You have to really know what your goals and dreams are before you can start saying no to frivolous and wasteful activities. Doing so can be so life-changing for many people because it brings a clarity you can’t reach in any other way. Knowing what you want and understanding what you are truly responsible for shifts your mindset into something far better than the normal chaos.

Another tactic is that you must understand that by being overcommitted, you aren’t doing anyone any favors. Every project we take on and every task we perform should be important enough that we devote 100% of our time, effort, and care to. Instead of being the hero for overcommitting ourselves, it would be far better if we were publicly shamed.

Conclusion

This is a very important topic for me right now as it usually is this time of year. We are in the last quarter of the year. Projects are wrapping up. Planning is underway for next year. The holidays are coming. There are a thousand things that have to be done by the end of the year and I know I am not alone in wanting to bring in the next year with a bang. I do not want to start next year burnt out from this year.

Getting Started with AutoMapper

If you are an experienced software developer you have no doubt written thousands of lines of code mapping properties of one object to properties of another object. This is commonly done when creating ViewModel objects or data transfer objects (DTOs). AutoMapper gives you a reusable, elegant solution to this problem. In this post, we will explore how AutoMapper does this.

What is AutoMapper?

AutoMapper is an object to object property mapping library. It is used to populate properties of one type from properties of another type. AutoMapper and other libraries like it promise to remove the need for developers to create that boring translation code we have all wasted time writing. However, the auto in AutoMapper works for a small handful of scenarios. If you follow the same convention they have followed, the configurations are definitely minimal. However, more complex scenarios require more complex configurations. Let’s take a look at a few examples.

The Scenario

Assume we are trying to populate a ConactViewModel object from a Contact object. That Contact object contains a Company endpoint named Company.

Listing 1.1 – The ContactViewModel Object

public class ContactViewModel
{
    private string _fullName = string.Empty;

    public int ContactID { get; set; }
    public string FirstName { get; set; }
    public string LastName { get; set; }

    public string FullName
    {
        get
        {
            if(string.IsNullOrEmpty(_fullName))
            {
                _fullName = $"{LastName}, {FirstName}";
            }

            return _fullName;
        }
        set
        {
            _fullName = value;
        }
    }

    public int CompanyID { get; set; }
    public string CompanyName { get; set; }
    public string JobTitle { get; set; }
    public DateTime BirthDate { get; set; }
}

The ContactViewModel object is a basic object that contains fields from both the Contact and Company.

Listing 1.2 – The Contact Object

public class Contact
{
    public int ID { get; set; }
    public string FirstName { get; set; }
    public string LastName { get; set; }
    public int CompanyID { get; set; }
    public string JobTitle { get; set; }
    public DateTime BirthDate { get; set; }
    public Company Company { get; set; }
}

Listing 1.3 – The Company Object

public class Company
{
    public int ID { get; set; }
    public string Name { get; set; }
    public string Website { get; set; }
}

Property Mapping the Manual Way

Property mapping the manual way includes a lot of code and it is a terrible waste of time. I can’t count the number of times I have written code like this and you probably can’t either. It is a terrible, terrible way to spend your adult life.

Listing 1.4 – Manual Property Mapping

public List<ContactViewModel> GetContactViewModelsManual()
{
    List<Contact> source = GetContacts();

    List<ContactViewModel> destination = (from s in source
                                            select new ContactViewModel
                                            {
                                                BirthDate = s.BirthDate,
                                                CompanyID = s.CompanyID,
                                                CompanyName = s.Company.Name,
                                                ContactID = s.ID,
                                                FirstName = s.FirstName,
                                                JobTitle = s.JobTitle,
                                                LastName = s.LastName
                                            }).ToList();

    return destination;
}

This is a pretty basic example of standard mapping code using a LINQ query. The Company endpoint is only referred to one time and the Contact ID property is the only other mapping that is not straight across.

Property Mapping with AutoMapper

AutoMapper does a lot of heavy lifting for you. However, it only works for mappings that follow a standard convention.

Listing 1.5 – Simple AutoMapper Scenario

public List<ContactViewModel> GetContactViewModelsSimple()
{
    var config = new MapperConfiguration(cfg =>
    {
        cfg.CreateMap<Contact, ContactViewModel>();
    });

    IMapper mapper = config.CreateMapper();

    List<Contact> source = GetContacts();
    List<ContactViewModel> destination = new List<ContactViewModel>();

    foreach (Contact contact in source)
    {
        destination.Add(mapper.Map<Contact, ContactViewModel>(contact));
    }

    return destination;
}

We get the benefit of two of those conventions based on naming guidelines. The first, one-to-one mappings where the property name of object B matches the property name of object A such as ContactViewModel.FirstName equals Contact.FirstName. The second, where the property of object B matches the endpoint property name plus the actual property name. In this case, ContactViewModel.CompanyName is automatically mapped from Contact.Company.Name. So, in the case of the above code, the only property that is not mapped is the ContactID property.

Listing 1.6 – The ContactID Mapping

public List<ContactViewModel> GetContactViewModelsComplex()
{
    var config = new MapperConfiguration(cfg =>
    {
        cfg.CreateMap<Contact, ContactViewModel>()
        .ForMember(dest => dest.ContactID, map => map.MapFrom(src => src.ID));
    });

    IMapper mapper = config.CreateMapper();

    List<Contact> source = GetContacts();
    List<ContactViewModel> destination = new List<ContactViewModel>();

    foreach (Contact contact in source)
    {
        destination.Add(mapper.Map<Contact, ContactViewModel>(contact));
    }

    return destination;
}

In this scenario, I am creating a manual mapping for the ContactID property from the Contact.ID property using the ForMember() method. I have to admit, though, I found this code very cryptic to write. It felt like a foreign language and it didn’t feel right. It is a .NET Framework library and it should feel like I am writing .NET code but it did not. Surely one will get used to it but it felt really unnatural. Perhaps unnatural isn’t the right word. It felt too complex.

Listing 1.7 – An Alternate FullName Mapping

public List<ContactViewModel> GetContactViewModelsComplex()
{
    var config = new MapperConfiguration(cfg =>
    {
        cfg.CreateMap<Contact, ContactViewModel>()
        .ForMember(dest => dest.ContactID, map => map.MapFrom(src => src.ID))
        .ForMember(dest => dest.FullName, map => map.MapFrom(src => $"{src.FirstName} {src.LastName}"));
    });

    IMapper mapper = config.CreateMapper();

    List<Contact> source = GetContacts();
    List<ContactViewModel> destination = new List<ContactViewModel>();

    foreach (Contact contact in source)
    {
        destination.Add(mapper.Map<Contact, ContactViewModel>(contact));
    }

    return destination;
}

In this scenario, I am manually populating the FullName property using string interpolation just as an example. It follows the previous ForMember usage pretty closely and it highlights how to do string manipulation in a mapping.

Conclusion

In this post, I have given a few fairly simple examples of how to use AutoMapper in your projects. I do recommend, however, that you create the mappings in static classes that are available from static methods that you can then call upon from other classes so you don’t have to recreate the config and mappings each time.

I have very little doubt that AutoMapper could save you massive amounts of time if you are doing translations that follow the standard conventions. However, allowing an external library to influence the design of your models is lunacy. Models should be pure and not be affected by such things. So, it comes down to whether or not creating the mapping configuration or the mapping code is more onerous to you.
An In-Depth Look at ASP.NET MVC ModelState

If you have spent much time around ASP.NET MVC, you have no doubt used ModelState just like all other good little MVC developers. Have you ever peeked under the covers, though, and looked at why and how it works? In this post, we will do just that.

What is ModelState?

ModelState is, at its core, the values of a form during submission. The form fields come in as a collection of name-value pairs. The form fields are accessible from ModelState as the full name of the property of your model. For example, if your model is a standard object, such as a Contact object, the name of the ID field will be available as ModelState[“ID”]. However, if your model is a view model and the Contact object is a property on the view model, the property will be available as ModelState[“Contact.ID”]. This mechanism allows MVC to create objects for us such as a fully formed Contact object in the Post event. It may be of interest to know that when you investigate the ModelState dictionary, each item tracks the error messages and value for that field.

The value comes in the form of a ValueProviderResult which tracks both the attempted value and the raw value that was submitted for the field. This will typically be the same but it may help you troubleshoot errors in your model because you can see what was mapped to the value even if it didn’t get set on the object.

A Simple Scenario

We can create this scenario very quickly.

Listing 1.1 – The Contact Model Object

Notice the data annotations used for validation. I have added many to show just how many different ways you can validate your forms. The most common types are used but there are many, many more.

public class Contact
{
    [StringLength(100, ErrorMessage = "First Name must be between 2 and 100 characters.", MinimumLength = 2)]
    [Required(ErrorMessage = "First Name is required.")]
    [Display(Name = "First Name")]
    public string FirstName { get; set; }

    [StringLength(100, ErrorMessage = "Last Name must be between 2 and 100 characters.", MinimumLength = 2)]
    [Required(ErrorMessage = "Last Name is required.")]
    [Display(Name = "Last Name")]
    public string LastName { get; set; }

    [EmailAddress]
    [Required(ErrorMessage = "Email Address is required.")]
    [Display(Name = "Email Address")]
    public string EmailAddress { get; set; }

    [Phone]
    [Required(ErrorMessage = "Mobile Phone is required.", AllowEmptyStrings = false)]
    [Display(Name = "Mobile Phone")]
    public string MobilePhone { get; set; }

    [DataType(DataType.Date)]
    [Display(Name = "Birth Date")]
    public DateTime? BirthDate { get; set; }
}

Listing 1.2 – Create Form Markup

This form uses the generic create template available in MVC.

@model TestModelState.Models.Contact

@{
    ViewBag.Title = "Create";
}

<h2>Create</h2>


@using (Html.BeginForm()) 
{
    @Html.AntiForgeryToken()
    
    <div class="form-horizontal">
        <h4>Contact</h4>
        <hr />
        @Html.ValidationSummary(true, "", new { @class = "text-danger" })
        <div class="form-group">
            @Html.LabelFor(model => model.FirstName, htmlAttributes: new { @class = "control-label col-md-2" })
            <div class="col-md-10">
                @Html.EditorFor(model => model.FirstName, new { htmlAttributes = new { @class = "form-control" } })
                @Html.ValidationMessageFor(model => model.FirstName, "", new { @class = "text-danger" })
            </div>
        </div>

        <div class="form-group">
            @Html.LabelFor(model => model.LastName, htmlAttributes: new { @class = "control-label col-md-2" })
            <div class="col-md-10">
                @Html.EditorFor(model => model.LastName, new { htmlAttributes = new { @class = "form-control" } })
                @Html.ValidationMessageFor(model => model.LastName, "", new { @class = "text-danger" })
            </div>
        </div>

        <div class="form-group">
            @Html.LabelFor(model => model.EmailAddress, htmlAttributes: new { @class = "control-label col-md-2" })
            <div class="col-md-10">
                @Html.EditorFor(model => model.EmailAddress, new { htmlAttributes = new { @class = "form-control" } })
                @Html.ValidationMessageFor(model => model.EmailAddress, "", new { @class = "text-danger" })
            </div>
        </div>

        <div class="form-group">
            @Html.LabelFor(model => model.MobilePhone, htmlAttributes: new { @class = "control-label col-md-2" })
            <div class="col-md-10">
                @Html.EditorFor(model => model.MobilePhone, new { htmlAttributes = new { @class = "form-control" } })
                @Html.ValidationMessageFor(model => model.MobilePhone, "", new { @class = "text-danger" })
            </div>
        </div>

        <div class="form-group">
            @Html.LabelFor(model => model.BirthDate, htmlAttributes: new { @class = "control-label col-md-2" })
            <div class="col-md-10">
                @Html.EditorFor(model => model.BirthDate, new { htmlAttributes = new { @class = "form-control" } })
                @Html.ValidationMessageFor(model => model.BirthDate, "", new { @class = "text-danger" })
            </div>
        </div>

        <div class="form-group">
            <div class="col-md-offset-2 col-md-10">
                <input type="submit" value="Create" class="btn btn-default" />
            </div>
        </div>
    </div>
}

<div>
    @Html.ActionLink("Back to List", "Index")
</div>

@section Scripts {
    @Scripts.Render("~/bundles/jqueryval")
}

Listing 1.3 – Create Post Method

if(ModelState.IsValid)
{
    ViewBag.Message = "Create Successful";
    return View(contact);
}
else
{
    return View(contact);
}

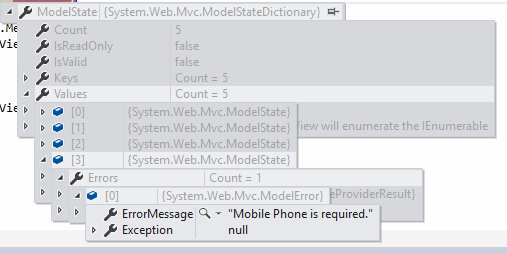
If you set a breakpoint at the ModelState.IsValid line and submit an empty form, you will be able to see the validation errors declared in the class via DataAnnotations. This would be the same for all other validation providers.

Conclusion

ModelState offers an end-to-end validation mechanism when combined with a good validation provider such as DataAnnotations. It provides a comprehensive way to report on automated errors such as those from Data Annotations and it allows you to add your own validation errors as well. MVC goes even further by providing an out-of-the-box solution to report on those validation errors in the form of the validation-related HTML Helpers.

An Introduction to the AntiForgeryToken HTML Helper

The ASP.NET MVC AntiForgeryToken HTML Helper is a widely used but not well-understood helper. In this post, I will look at the details of the helper, explain how it works, and how you should be using it.


What is the AntiForgeryToken Helper?

The AntiForgeryToken helper protects your site from cross-site request forgery. Cross-site request forgery is the process of submitting data to your site without visiting your site. It can be done programmatically or scripted so that data is sent to your site once or repeatedly and opens you up to several other attacks or exploits.

For example, if an attacker wanted to hide in plain sight, she could create 1000 requests or 10000. It would be harder to find one in so many.

How does it work?

There are two parts to implementing the AntiForgeryToken. The first is on the client. Within the form helper that is being submitted, you will need to use the AntiForgeryToken helper. Its use is very simple:

@Html.AntiForgeryToken()

The AntiForgeryToken helper creates a hidden HTML form field and will generate a ‘token’ string as the field’s value. For example:

<input name="__RequestVerificationToken" type="hidden" value="_xZvPI6jxbLCaXjDU8W0eYLtyhs61Xxeyf1HHSQPlDO7hKL7YUjEBE4IehvvRwTSURknLfgsWM2kiicAbXtTJwDi5OPVm3on-vzkw1W5nzU1">

Also, every request will have a new token.

The second part of the implementation is just as simple to implement. The action result method that is processing the form must be decorated with the [ValidateAntiForgeryToken] attribute.

Now, if requests that are processed by the server that do not come in with the correct __RequestVerificationToken value will be served with the following error message:

The required anti-forgery form field “__RequestVerificationToken” is not present.

The value must also be valid. It must be a value that can be decrypted by the server. If you were to try to self-generate the value of the __RequestVerificationToken field, you will be served this error message:

The anti-forgery token could not be decrypted. If this application is hosted by a Web Farm or cluster, ensure that all machines are running the same version of ASP.NET Web Pages and that the <machineKey> configuration specifies explicit encryption and validation keys. AutoGenerate cannot be used in a cluster.

Conclusion

The AntiForgeryToken HTML Helper included in ASP.NET MVC basically gives you a free pass on one of the OWASP Top 10 web application security vulnerabilities and takes only a few seconds to implement for each form.

A Gentle Introduction to Test Driven Development (TDD)

TDD is all the rage and the best thing since sliced bread. TDD is a terrible abomination that should die a quick but very painful death. TDD is great. TDD is terrible. If you look for information on TDD, you can get all of these opinions and everything in between. This is actually very encouraging. Because there are so many strong, heartfelt opinions and some of those opinions are so polarizing, it means the topic is a good one and you should learn about it and form your own opinion and take a stance.

What is TDD?

TDD, or test driven development, is the practice of writing a test before writing code and then writing only enough code to satisfy the test. Then, refactoring that code so that the code is as good as you can make it while still satisfying the test. This is, of course, the 10,000-foot view. When you get closer to ground level, though, you can see more details. For example, the test should be complete. It should be testing what is really important. Only when you are completely happy with the test should you start writing code that passes the test. This process, this cycle, is very important. If you leave any of those steps out or if you don’t approach the steps with wholesome good and understanding, you are not satisfying the requirements.

If you have come into a project that actively used unit tests but not TDD, you have no doubt seen, first-hand, useless tests. Tests that are created to make the developer feel good about the time they are taking to create them or tests that are there to increase code coverage but tests that are, nonetheless, completely worthless. Tests that measure the most mundane, unimportant things. Tests should give value beyond the success of the test. Tests should be measuring the quality and accuracy of the code.

TDD does have a real effect on the architecture of your program. If you are really testing features, there are several ways that feature could be designed and there are many ways that it cannot or should not be designed.

Imagine this scenario: You need to retrieve data from a logic class that will first gather that data from a repository class. It is likely that you will have to design the method in your logic class to be loosely coupled with a repository interface and not a concrete repository class. It is also likely that you will need to either inject that interface class through dependency injection or provide it in another way. It just so happens that both of those practices should be considered best practices. They make your code more flexible and resilient. And, if you are following the ‘only enough code to satisfy the test’ tenet of TDD, you likely don’t have a lot of superfluous code in your method that will have to be refactored. In the end, you will have a cleaner code base and a code base that you can feel more confident about because of the suite of tests you have designed.

I am not an advocate of TDD. I find it just too much on smaller projects and, in larger projects, it takes a mighty amount of discipline to keep in top shape. However, when I do practice it, I am generally happy with the results. The architecture and code are clean and more resilient. The problem is the discipline. In my personal projects, I just don’t always have the energy to practice TDD. Call it laziness if you would like.

Advocates of TDD would likely tell you that TDD is always the answer which is opinion, not fact. Sometimes, TDD is completely worth it and sometimes it just isn’t. Penicillin, which has saved the lives of more people in history than other medication (approximately 200 million), isn’t always the answer either and you should be wary when told that TDD is always the answer.

Pros

There are plenty of pros but the main arguments are listed below.

  • The architecture of your applications evolves slowly and methodically in a very controlled manner.
  • Components of your application will be (usually) loosely coupled because they are being tested.
  • The code is much easier to refactor because you will know if you have broken anything when tests fail.
  • Unit tests can often be better than written documentation because they are another form of documentation that developers should find easy to understand.

Cons

Again, these are just the main arguments but there are cons aplenty, also.

  • Tests have to be maintained and there is an expense in doing so.
  • Writing tests is not the same thing as writing good tests.
  • TDD requires more up-front work but the argument can be made that it will save time and effort in the long run.
  • Nearly impossible to do for legacy code. This makes it more difficult for teams to do because doing TDD on one project and not on another because it makes for a more jumbled experience.

The Tools

There are two main tools you will need in order to practice TDD effectively. First, a unit testing framework. Unit testing frameworks allow you to create the tests that measure your code. These frameworks exist for just about any language available and many languages have several unit testing libraries available.

  • Nunit (.NET)
  • JUnit (Java)
  • PHPUnit (PHP)
  • PyUnit (Python)

The second tool you will need is a mocking framework. Each mocking framework will come with their own rules of use but, in general, mocking frameworks allow you to build mocked-up endpoints to classes and interfaces in your code so that you eliminate dependencies on external resources. For example, a repository class can be mocked to eliminate the dependency on a database or folder structure. Again, there are mocking frameworks available for just about every possible programming language and many languages will have more than one. Here is a list to match the frameworks above.

  • Moq (.NET)
  • JMockIt (Java)
  • Phake (PHP)
  • Mox (Python)

Conclusion

As you can see, there is not an easy answer for whether or not you should be doing TDD. It has its benefits and drawbacks. In the end, you have to make the best decision for your specific project and your specific team. Regardless of whether you do practice TDD or not, the more information you have, the better off you will be in the long run. In a later post, I will show the entire TDD process of a small application being developed from start to finish. Hopefully, this will make it easier for you to form your own opinions about TDD and whether or not it is for you.

The Strategy Design Pattern in C#

The strategy design pattern allows you to encapsulate a group or family of algorithms, making them interchangeable. This allows code to determine which strategy to use at runtime. The strategy pattern is a behavioral pattern and is one of the original design patterns defined by the Gang of Four (GoF).


What Problem Does It Solve?

The strategy pattern allows you to write less fragile and coupled code. Instead of planning for every eventuality and creating code structures to deal with them, the strategy pattern gives you a clearly defined and easy to implement mechanism for algorithm selection at runtime.

The Actors

Billing Contract

The billing contract is a fairly simple interface to enforce behavior across all contracts.

Listing 1.1 – IBillingContract.cs
public interface IBillingStrategy.cs
{
    DateTime GetDueDate();
    void SendBill(string[] address);
}

Abstract Billing Strategy

The Billing Strategy is the only object that inherits from the IBillingStrategy interface. However, the GetDueDate method is implemented as abstract so each child of the abstract billing strategy must create their own implementation.

Listing 1.2 – BillingStrategy.cs
public abstract class BillingStrategy : IBillingStrategy
{
    public abstract DateTime GetDueDate();

    public virtual void SendBill(string[] address)
    {
        Console.WriteLine("Sending Bill to: ");

        foreach(string addressPart in address)
        {
            Console.WriteLine(addressPart);
        }

        Console.WriteLine($"Due Date: {GetDueDate().ToShortDateString()}");
        Console.WriteLine();
    }
}

Default Billing Strategy

This billing strategy will be the default to be assigned to new customers. It could also have been named Net 15.

Listing 1.3 – DefaultBillingStrategy.cs
public class DefaultBillingStrategy : BillingStrategy
{
    public override DateTime GetDueDate()
    {
        DateTime dueDate = DateTime.Now.AddDays(15).Date;

        return dueDate;
    }
}

Net 30 Billing Strategy

This billing strategy allows 30 days for payment.

Listing 1.4 – Net30BillingStrategy.cs
public class Net30BillingStrategy : DefaultBillingStrategy
{
    public override DateTime GetDueDate()
    {
        DateTime dueDate = DateTime.Now.AddDays(30).Date;

        return dueDate;
    }
}

Customer

The customer is a simple object to hold the name and address values as well as the BillingStrategy object.

Listing 1.5 – Customer.cs
public class Customer
{
    public int ID { get; set; }
    public string Name { get; set; }
    public string StreetAddress { get; set; }
    public string City { get; set; }
    public string State { get; set; }
    public string PostalCode { get; set; }
    public BillingStrategy Strategy { get; set; }

}

Implementation

The implementation is rather simple if you look past the customer creation code.

Listing 1.6 – Implementation
List<Customer> customers = new List<Customer>();

customers.Add(new Customer
{
    City = "San Francisco",
    ID = 1,
    Name = "Digital Monikors",
    PostalCode = "94122",
    State = "CA",
    Strategy = new DefaultBillingStrategy(),
    StreetAddress = "100 W Main St"
});

customers.Add(new Customer
{
    City = "New York",
    ID = 2,
    Name = "Broadway Partners",
    PostalCode = "10001",
    State = "NY",
    Strategy = new Net30BillingStrategy(),
    StreetAddress = "100 E Main St"
});

customers.Add(new Customer
{
    City = "Denver",
    ID = 3,
    Name = "Mile High Design",
    PostalCode = "80201",
    State = "CO",
    Strategy = new DefaultBillingStrategy(),
    StreetAddress = "100 Main St"
});

foreach(Customer customer in customers)
{
    string[] address = new string[2];
    address[0] = customer.Name;
    address[1] = $"{customer.City}, {customer.State} {customer.PostalCode}";

    customer.Strategy.SendBill(address);
}


Console.ReadKey();

Conclusion

If you are an experienced programmer, you may have already used the Strategy design pattern in your work and possibly not known what it was called. It is a very common pattern and one of the easiest to implement.